Before we get into “what is the best timelapse screen recorder,” let’s first be crystal clear on what is a timelapse video. Timelapse video, as its name implies, is a video created by utilizing the time-lapse photography technique, where frames are shot much slower than a normal rate. When you place these short videos together on an editing time-line and speed up, it simulates a normal video. Obviously, the process is a little bit time-consuming and you may need some tools and tips to speed up your work. That’s why a timelapse screen recorder and PC are necessary. With the combination of a PC and a timelapse screen recorder, you can do everything with your lapse videos without hassle.

If you have no idea how to choose the best timelapse screen recorders or how to timelapse a screen recording, this guide will give you the answer!
What Are the Benefits of Time Lapse Videos?
Haven’t decided whether to install a timelapse screen recorder? You may get the answer after learning about the benefits of timelapse videos.
- Captivating Storytelling: You can tell a story by condensing a long video into a short one and showing your perspective efficiently.
- Versatility: Timelapse videos are widely-used to show changes in time and emotion.
- Increased Visibility: Time lapse videos are more competitive in visual appeal than images and general videos on social platforms.
Top 5 Timelapse Screen Recorders for PC
As introduced earlier, there are many benefits to timelapse videos. So, how to generate timelapse videos? It’s time to let a timelapse screen recorder to help you make it. Read the following 5 best timelapse screen recorders and pick the one that can work you out to create a timelapse video.
1. iTop Screen Recorder
Our first recommendation is iTop Screen Recorder, a versatile screen recorder that can help you capture every activity on your screen in several simple steps. More specifically, you can record part of the screen, full screen, or fixed window to your preference. With its schedule recording feature, you can automatically record short videos at certain intervals. Next, you can merge the video clips into a timelapse video. The process is very simple.
For more features of iTop Screen Recorder, refer to its feature list.
Core features:
- Flexible recording region: It allows you to flexibly record part of the screen, full screen, or fixed window. That can cater to different recording needs.
- Customizable schedule recording: Its scheduled recording feature allows you to specify the exact start and stop times for your recording. That makes it a perfect option for capturing online meetings or other scheduled tasks. For example, you can easily get the answer to how to screen record protected videos.
- 4K high-definition video capture: As an HD screen recorder, iTop Screen Recorder allows you to record up to 4K resolution in 120 FPS without any lag.
- Advanced video editor & compressor: iTop Screen Recorder comes with a video editor that enables you to enhance your recording by trimming unwanted parts, merging several clips, or splitting a long video into several short videos.
Quick Guide: How to Timelapse a Screen Recording with iTop Screen Recorder?
Step 1: Download and launch iTop Screen Recorder on your computer.
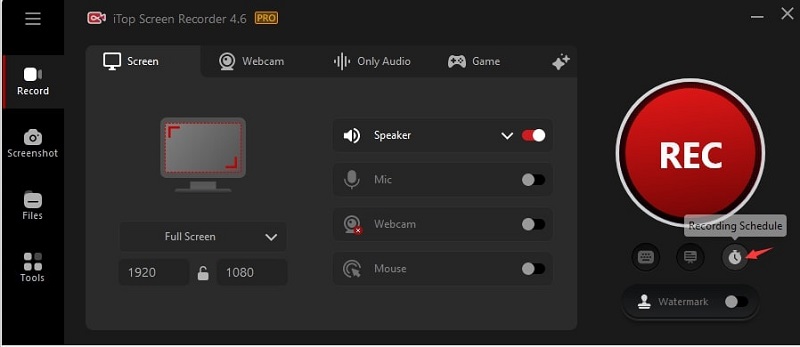
Step 2: Click on the “Recording Schedule” icon under the REC.
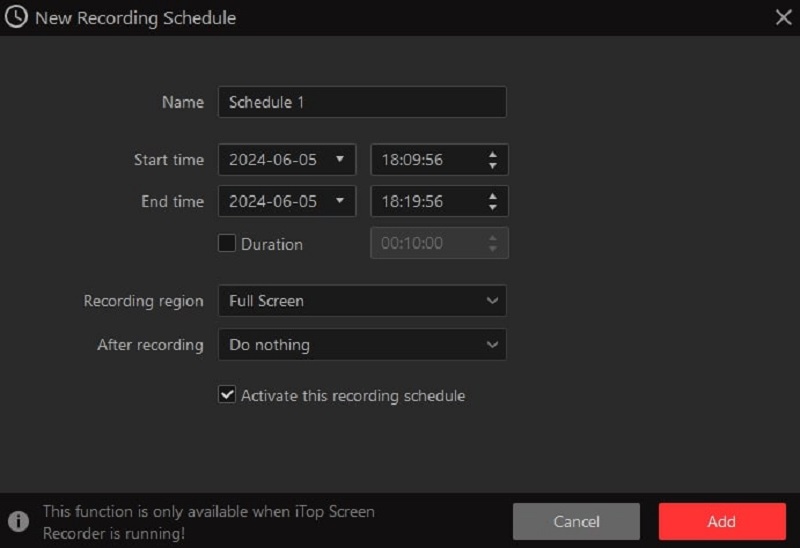
Step 3: Click on the “Add” button to create your recording schedule with its name, start and end time, record area, and what you want to do after recording. Once set, click the “Add” button to apply the settings.
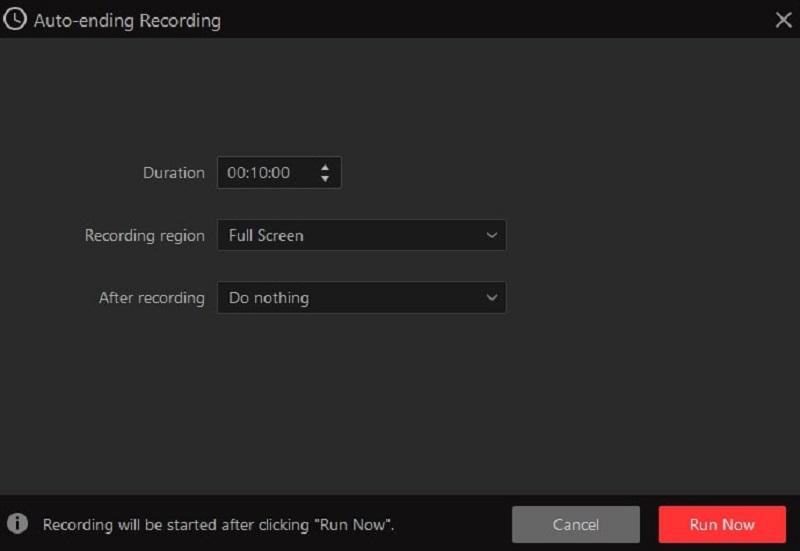
Step 4: Then, click “Run Now” to start an auto-ending recording.
2. Debut Video Capture
Another good timelapse screen recorder Widnows 10 you can have is Debut Video Capture, which allows you to capture the image sources from a PC or any device and save them as a video. Before recording, you can customize the video color and resolution. Then, you can also add filters, text captions, timestamps, and other elements to your recording based on your needs. Besides, you don’t have to worry about compatibility issues, as this software supports many different video formats, including MP4, MOV, and AVI. That’s not all Debut Video Capture offers. For more exciting features, you can refer to the following list:.
Core features:
- Capture video from a webcam or any other video input device.
- Record videos in AVI, WMV, FLV, MP4, MOV, and more video formats.
- Record the entire screen, a single window, or a selected window.
- Mouse highlighting spotlights the location of the cursor.
- Display keystrokes in screen recordings.
- Replace your background with an image, video, or solid cord using its Green Screen tool.
Quick Guide: How to Do a Timelapse Screen Recording with Debut Video Capture
Step 1. Download and launch Debut Video Capture on your computer.
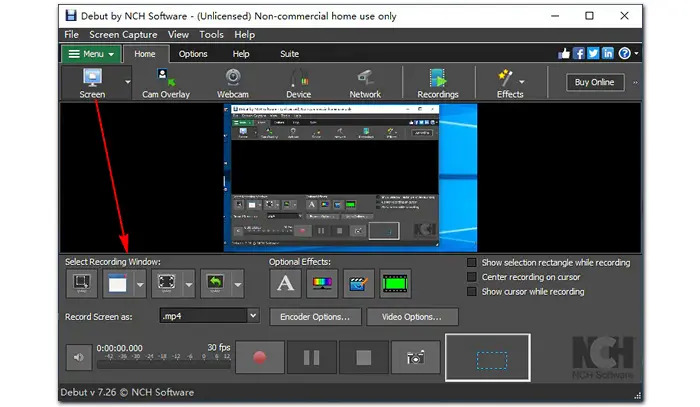
Step 2. Go to the “Screen > Select Recording Window” to choose the window you want to capture.
Step 3. Click on the “Video Options” button and tick the box next to “Enable Time-lapse”.
Step 3. Adjust the number after “Capture One Frame Every” to set the frequency of your video recording and click on the little red spot icon to start the recording.
3. Bandicam
Our third recommendation for a timelapse screen recorder is Bandicam. It is a closed-source video recording software for Windows. Unlike the two applications introduced above that offer many advanced features, this software is simpler and only has some basic functionality. You can use it to capture a video with the system audio, add an overlay, add a mouse click effect, or schedule your recording at a specific time. Anyway, it allows you to capture every activity on your screen in MP4 or AVI format. You can also use it to record any external video devices, such as webcams, Playstations, IPTVs, and more. Below are some of its core features.
Core features:
- Allows you to make chroma key videos in real time.
- Allow adding webcam overlay.
- Schedule recording.
- Allow 3D game recording at 480 FPS.
Quick guide: How to Time Lapse Screen Record with Bandicam?
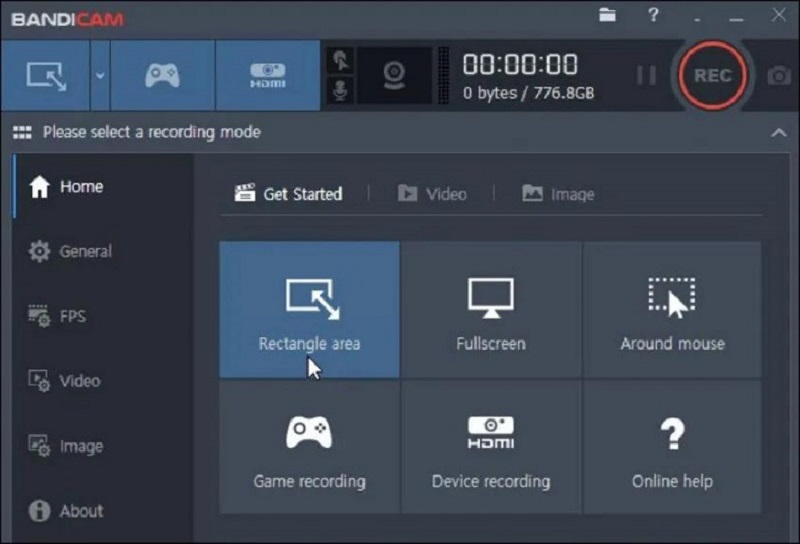
Step 1. Install and launch Bandicam and choose a preferred recording mode.
Step 2. Click on the “Scheduled Recording” icon, which looks like a timer, and then click on the “Add” button to add a recording task.
Step 3. Set the start and end time of the scheduled recording and click on the “REC” icon to start recording.
Step 4. Once finished, you can download the recording to your computer.
4. OBS Studio
OBS is an open-source video editing software that enables you to capture and stream video in real time on your PC, Mac, and Linux. With it, you can create a timelapse video effectively. Not only that, but it can also mix multiple sources, add filters, change colors, and more. Once you finish recording, your recording will be stored in MKV format. You can change it to other popular video formats like FLV, MOV, MP4, TS, or M3U8. That can meet most of your needs for streaming video on different platforms, such as YouTube, Twitch, Facebook, and so on. Keep reading to learn more about the features of OBS and how to do a timelapse screen recording.
Core features:
- Capture videos in high quality.
- Record video or audio in real time.
- Add transitions between different scenes.
- Supports keyboard shortcuts.
Quick guide: How to Timelapse a Screen Recording on Windows with OBS Studio?
Step 1. Install OBS Studio on your computer.
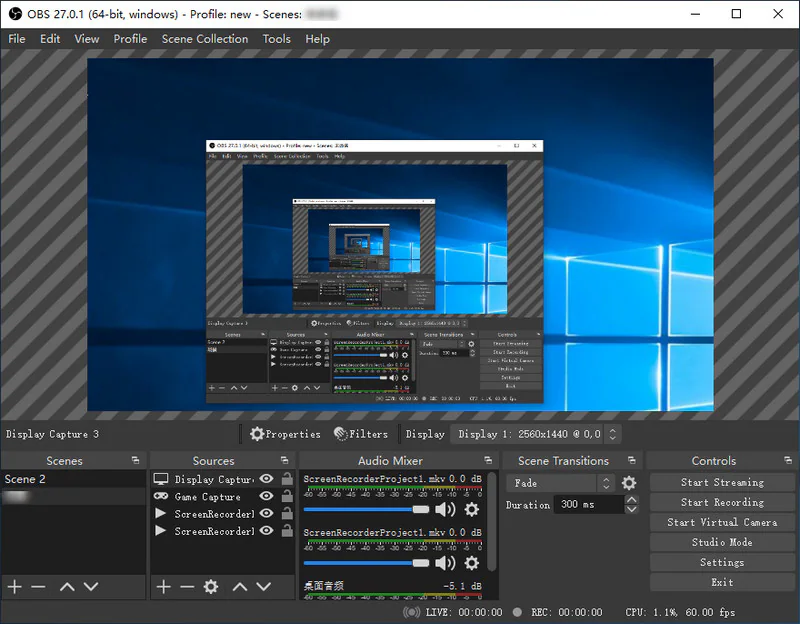
Step 2. Tap the + button on the sources tab and select what you want to record from your screen.
Step 3. Tap the tools option at the top right corner and choose the output timer and the ending time of recording. Once done, click on the start button to start recording.
Step 4. Click on the stop recording button if you want to end the recording process.
5. Cam Studio
CamStudio is one of the most professional screen-recording software programs. It has almost all the basic and advanced features that can meet most recording needs. Whether you’re an experienced video creator or a beginner, you can generate a satisfying video with this screen recorder. Additionally, it is also a free and open-source program, so everyone can use it without restriction. But it only supports Windows and offers very limited editing capabilities. If you want to unlock more features or want a HD screen recorder, you’ll need to install some of the user-made extensions or refer to other recommendations in our guide. Now, you can check its features and see how to time lapse screen record using Cam Studio.
Core features:
- Record screen and wecam simultaneously.
- Record audio from your system and external microphone.
- Custom recording area.
- Add annotations of attach a watermark.
- Supports MP4, AVI, and SWF.
Quick guide: How to Make a Timelapse Screen Recording with Cam Studio?
Step 1. Download and run OBS Studio on your computer.
Step 2. Click “Region” and choose your desired recorded area. If you want to adjust the settings, just click “Options”.
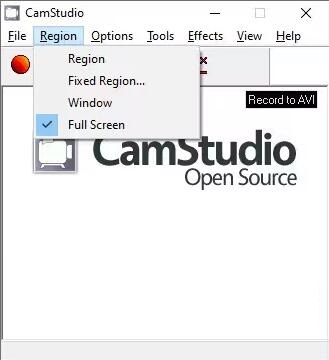
Step 3. Then, click on the “File” in the upper left corner and choose the Record option. Once ended, click on the “File > Stop” to end the recording process.
Best Practices of Timelapse Videos
After learning the best screen recorder, let’s briefly learn about some of the best practice of timelapse videos.
- Holy grail timelapse: A time-lapse that captures the dramatic change from dawn to sunrise or dusk to nightfall, showcasing the transition of natural light. Example: A time-lapse that starts in darkness, then gradually brightens as the sun rises over a landscape.
- Astro timelapse: A time-lapse that captures the movement of stars, planets, and other celestial objects across the night sky. Example: A time-lapse of the Milky Way galaxy arching overhead as the Earth rotates
- Plant timelapse: A time-lapse that captures the slow growth and movement of plants over an extended period. Example: A time-lapse of a flower blooming from bud to fully opened flower.
- Motion control timelapse: A time-lapse that uses specialized equipment to precisely control the camera's movement, allowing for smooth, controlled camera paths. Example: A time-lapse of a cityscape where the camera smoothly pans and tilts to capture the changing scene.
- Basic timelapse shot: A simple time-lapse that captures the gradual change of a scene over time, such as clouds moving across the sky or traffic flowing through a city. Example: A time-lapse of a busy city street showing the ebb and flow of pedestrians and vehicles.
The Bottom Line
That’s all about timelapse screen recorder. From this guide, you can see that iTop Screen Recorder is the best option for its ease of use and rich features. With it installed on your Windows 10, you can not only record a video but also audio from your computer. Want to know how to record on peacock? iTop Screen Recorder can perfectly meet your needs. If you want to learn more about this timelapse screen recorder windows 10, don’t hesitate to download and give it a try!
 Vidnoz AI creates engaging videos with realistic AI avatars. Free, fast and easy-to-use.


