Knowing how to record activity on screen is important. By mastering this skill, you can record your workflows in real-time, share troubleshooting problems with someone when they’re not sitting right next to you, or record your achievements in games and share them with your friends. Anyway, there are some simple methods for you to record screen activity.

Now, let’s follow this guide to record your screen activity on a Windows, Mac, iPhone, or Android.
What On-Screen Activities Can You Record?
Before you record activity on computer, it’s wise to learn what kind of movement or content you can record and in what scenarios you need to make a screen recording, thus weighing if the following method can help you capture what you want.
What content can you record with a screen recorder? Usually, a screen recorder can capture many events, such as active programs/apps, keystrokes, mouse movement and clicks, delays between actions, and more. Anyway, you can record every activity that happens on your screen.
In what scenarios do you need to make a screen recording? You can record your screen for many purposes. You can create video recordings for training, record your screen to make a tutorial video, record an online meeting or gameplay, etc.
If you want to take a recording, the following tutorial will tell you how to capture these on-screen activities on different devices.
How to Record Activity on Screen on Windows PC?
On a Windows PC, we prepare several methods with different edges and shortcomings, thus suitable for various user groups. Now, read the following guide and pick the most appropriate method.
#1. Record Activity on Screen on PC Effortlessly & Free
If you’re looking for a quick recording option, this professional and easy-to-use screen recorder - iTop Screen Recorder can perfectly meet your needs. With it, you can effortlessly record every on-screen activity, leaving no clicks or mouse movements undocumented.
Whether you’re a professional content creator or simply want to capture your screen for fun, iTop Screen Recorder has everything you need. More specifically, you can embrace these notable features if this tool is installed.
l Free to Record Activity on Screen
iTop Screen Recorder is free to use without hidden fees or requests for your credit card information.
l Record All On-Screen Operations
With this screen recorder, you can capture every activity on the screen, e.g., record mouse clicks, mouse movements, keypress, active apps, etc. Or you can also decide the recording area. For example, you can record part of screen or the full screen.
l Avoid Omitting Any Sound
It comes with a Mic and Speaker, allowing you to capture your sound or system sound. Its denoiser feature can help you remove noise from your background, leaving you with a crystal-clear recording. That makes it a great option to record Zoom meeting without permission.
l High-Quality On-Screen Activity Recording
With hardware acceleration of NVIDIA, AMD, and Intel, iTop Screen Recorder can help you record 4K UHD, 1080p 90fps FHD videos with no fps drops and no lags.
l Easy to Edit Recorded Activities on Screen
More importantly, it comes with a video editor, enabling you to polish your recordings with various editing tools further. So, you can cut unwanted parts of your recordings or add wanted elements to your recordings as you wish.
Step-by-step Guide to Record Activity on Screen Using iTop Screen Recorder
Now, it’s time to record activity on a computer using iTop Screen Recorder by following these steps.
Step 1: Download iTop Screen Recorder on your computer.
Step 2: Open the screen you wish to record and launch iTop Screen Recorder. Click on the arrow next to the Full Screen to select the area you wish to record. Then, click REC to start recording.

If you want to visualize your keypress, you can click on the keyboard icon below the REC icon to achieve your goal. Similarly, you can go to Settings > Mouse to visualize your mouse clicks.

Step 3: Once done, click on the read square-shaped button to stop recording. Then, you can view and edit your recording based on your needs.

#2. Record Screen Activity with Xbox Game Bar
Another option for Windows computers to record activity on desktop is to use Xbox Game Bar, a native gameplay recording feature built into Windows 10. It is a good option for gameplayers who like to record the sound of the game.
However, if you want more from a screen recorder like video editing or other advanced features, you will find yourself disappointed. Xbox Game Bard won’t offer any advanced or complex editing features. Moreover, it lacks some flexibility as it doesn’t support recording the entire screen or multiple screens at the same time.
Anyway, everything has two coins. If you just want a quick recording option without installing any third-party app, go for Xbox Game Bar. Or if you want to record screen without Xbox Game Bar, then go for other options introduced in this post.
Here are more pros and cons of Xbox Game Bar.
Pros:
- Free to use.
- Inbuilt tool; no need to download.
Cons:
- Limited customization settings and features.
- Cannot record the entire screen.
- Cannot record several windows simultaneously.
- Frequently crashes.
Steps to Record Activity on Computer Using Windows Inbuilt Tool
Now, let’s follow these steps to see how to screen record on Windows.
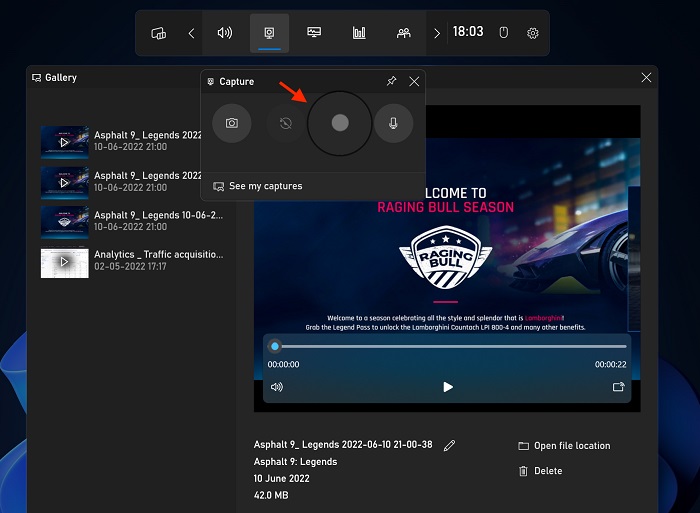
Step 1: Open the Window you wish to record and press the Windows Key + G to open the Game Bar.
Step 2: Click the Capture icon from the top menu bar. Click on the Record button to start recording.

Step 3: Click on the same button to stop recording. Then, your recordings will be stored in the Gallery section of the tool.
#3. Record Activity on Computer with OBS Studio
OBS, short for Open Broadcaster Software, is a free and open-source software that can help people track activity on computers easily. It works seamlessly with Windows, Mac, and Linux and is a great option for recording gameplay. But for some users, this tool is a little bit complicated to use and doesn’t come with advanced capabilities. For example, it doesn’t allow you to screen record protected videos.
Besides that, here are more pros and cons of it, shown below.
Pros:
- Free and easy to use.
- Diverse features.
- Support various filters.
- Flexible settings.
Cons:
- Complex and difficult for green hands to handle.
- Cannot add the same video stream to several scenes simultaneously.
Steps to Record Screen Activity Using OBS
Now, let’s see how to track activity on computer using OBS.
Step 1: Open and launch OBS on your computer. From the Source tab, click on the “+” button and select Game Capture.
Step 2: Rename it and click on the OK button to proceed.
Step 3: Select Capture Any Fullscreen Application from Mode, then click on the OK button to continue.
Step 4: Open the window you wish to record and press the Hotkey to start recording.

How to Record Activity on Mac?
If you’re a Mac user, then you’re in luck as you can directly record screen activity using the QuickTime player, a built-in media player that can handle some simple recording tasks. Like all other native recording options introduced above, QuickTime Player is also easy and free to use. But unlike the screen recorder for PC introduced above, which has a lot of advanced features, the QuickTime Player only provides you with some simple features. Here are more pros and cons of it.
Pros:
- Free and compatible with most macOS computers.
- Works seamlessly with iPhone and iPad.
Cons:
- It is complicated to use.
- When you record with Soundflower, you can’t hear the computer’s sound.
If you want to screen record with the QuickTime Player, just follow these steps to see how to record screen video on Mac.
Step 1: Go to the QuickTime Player and click on File > New Screen Recording.
Step 2: Choose where to record. You can choose to record a full screen or part of your screen, then click on the Record button to start recording.

Step 3: Once done, click on the black square to stop recording.
How to Record Screen Activity on iPhone & Android?
If you’re using an iPhone or Android, things get easier. Both iPhone and Android come with recording features that allow you to record all activity on your screen. Though this method is easy, it is not perfect. Here are some pros and cons of using this method. After weighing that, you can decide whether to use this method or not.
Pros:
- Easy and free to use.
- No installation.
Cons:
- No advanced features.
Now, let’s take the iPhone as an example and see how to record screen activity on the iPhone.
Step 1: Open the screen you wish to record.
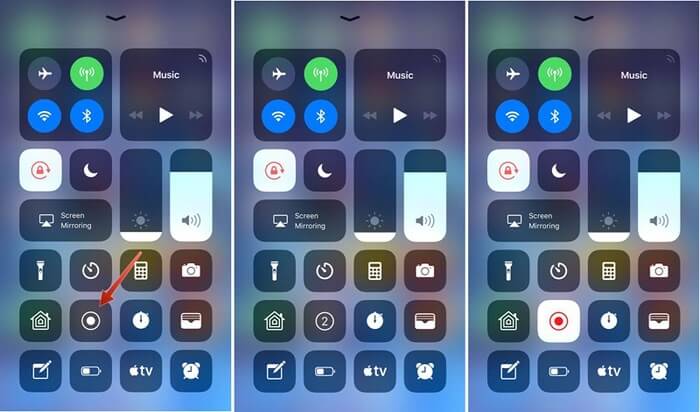
Step 2: Swipe to open the Control Center and tap the screen recording button. After a countdown, the recording will begin.
Step 3: Once done, you can tap on the red icon at the top of the screen and tap Stop to stop recording.

Conclusion
That’s all about our guide on how to record activity on screen. As you can see, there are many solutions for you to record what happens on your screen. On a Windows PC, your best solution is to use a 1080P screen recorder, which can help you capture every movement of your screen, including your mouse movement, key presses, and so on. More importantly, the quality of the video will be high, so you can use it for a second creation without worrying about video quality. As for other users, they can pick the right solution depending on the device they’re using.
 Vidnoz AI creates engaging videos with realistic AI avatars. Free, fast and easy-to-use.


