Video streaming services show the big convenience to explore TV programs and movies online without going to cinema. Along with the growth of those service, other derived demands come out, for example, screen recording the content for offline watching or other personal use. However, many people encounter black screen problem when they try to screen record protected videos from restricted websites or apps.
Is it possible to screen record protected videos without black screen? How to screen record protected videos without black screen? In this article, you can get all question asked.

Disclaimer: This article is only aimed to solve users' problems about how to screen record on websites that don't allow it. The unauthorized recording of protected videos is prohibited. We don't encourage any illegal recording activities.
Can You Screen Record Protected Videos
Theoretically, you can't screen record protected videos. Tons of people reported that they were not allowed to screen record protected videos with a common screen recorder and black screen appears when they play the recording. That is, most services block screen recording and screen capturing feature through DRM encryption on exclusive video content for copy protection. Screen capturing APIs are blocked and all the recordings result in a black screen with only audio. Chrome browser may also prevent you from screen recording DRM protected videos even if you capture lectures or other learning material for personal use.
Is there a screen recorder the bypasses black screen? Thankfully, iTop Screen Recorder is one of the few screen capture utilities that support screen recording protected videos with no trouble. Using it, black screen and lagging issues can be eliminated when capturing 4K HD protected videos.
How to Screen Record Protected Videos Without Black Screen on PC
iTop Screen Recorder is a trusted screen recorder anti block available for PC. It introduces an easy way to capture any content on the screen, including encrypted streaming videos and livestreams, with no flaws. As a screen recorder no time limit, it allows you to record full movie or full episodes regardless of the duration.
iTop Screen Recorder employs an Enhanced Mode to scree record DRM protected videos without a black screen. You can seamlessly capture favorite TV shows, sports games and other encrypted content from any streaming service - like Netflix, Peacock - without worrying about the block restriction. It empowers you to create high-quality screen recordings, keeping original 4K/1080p HD resolution and frames rate up to 120 FPS. Thanks to hardware acceleration and low CPU usage, it delivers a super smooth recording experience, no lags and no dropped frames.
With the support of webcam and microphone, the reliable screen recorder not only enables you to record protected videos with clear audio, but helps content creators make reaction or review videos with themselves. Its built-in video editing tools can be used to trim, crop screen recordings and add text, music, special effects making your video more engaging and professional.
iTop Screen Recorder is free to use, empowering you to screen record protected videos without black screen at no cost. Having an easy-to-navigate interface, beginners can quickly get how to use it without guesswork.
Steps to Screen Record DRM Protected Videos on PC
Step 1. Free download and install screen recorder without black screen on your PC. It is fully compatible with Windows 11, 10, 8/8.1 and 7.
Step 2. For better result, you can set up preference at the beginning.
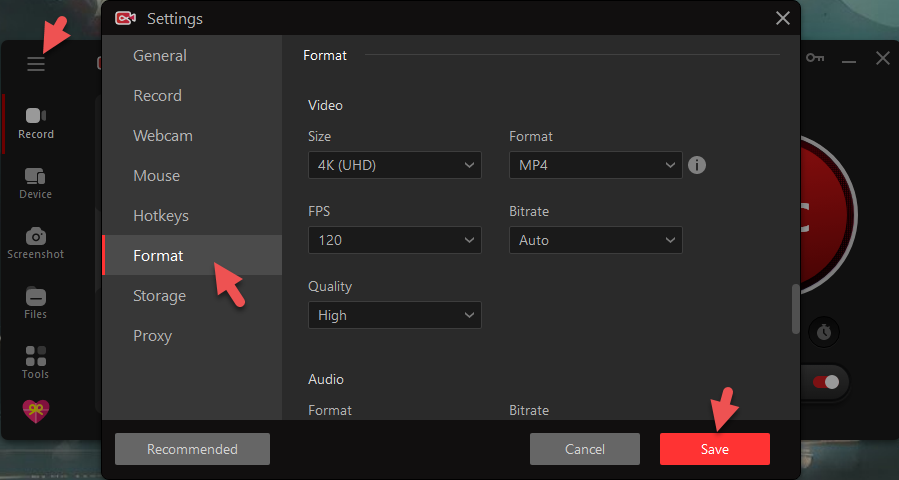
Launch iTop Screen Recorder. Click the three lines icon on the top left corner in the interface and select Settings. Move to Format > Video and adjust the recording resolution, FPS, bitrate and format. You can also adjust audio settings making the parameters meet your needs. After all done, click Save.
Step 3. Now, back to the main interface.
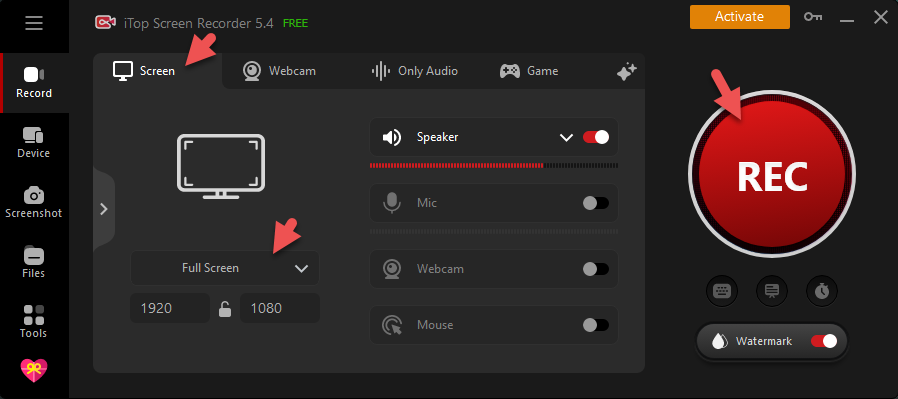
- Go to Record > Screen.
- Select to record full screen, part of screen, a window or any area in a fixed aspect ratio.
- Turn on Speaker to record protected videos with audio.
- Turn off other options to ensure only the video content are capture.
- Play the video you want to record. Press Ctrl and Click REC button simultaneously to activate Enhanced Mode and start screen recording protected videos without black screen.
Step 4. After 3-second countdown, a mini control bar appears. Click Done button to stop recording whenever you want to end.
The captured video will be listed in Files > Video. From here, you can access video editor to enhance your videos by adding filters, stickers, BGM. You can also compress the video for sharing via email, Discord or other apps.
iTop Screen Recorder also features a screenshot tool that is working for take a screenshot from a website that doesn't allow it. You can flexibly take a partial or full screenshot on Windows and save a whole webpage as an image without black screen issue.
How to Screen Record Protected Videos on Mac
For Mac users, the pre-installed QuickTime works as a powerful free screen recorder that enables you to screen record protected videos on Mac. It offers three recording options, movie recording, audio recording and screen recording to meet all your recording demands. And, screen recording option can help you record any video from website with audio effortlessly.
In the following, let's get how to screen record protected videos on Mac using QuickTime.
Step 1. Download & install QuickTime safely on your Mac, and then launch it.
Step 2. Click "File" at the top of the screen of QuickTime Player, and then hit the New Screen Recording option. Once it starts the recording, go to play the protected videos that you expect to record.

Step 3. When you finish recording the video, click on the recording control widget and tap the red circular button to stop the recording.
Also Read: Where Are Screen Recordings Saved on Mac >>
How to Screen Record Protected Videos on Android/iPhone
The built-in screen recorder in iOS/Android devices doesn't have the ability to bypass DRM protections on protected videos during recording. You'd better seek for another working solutions. Here are 3 methods that can lead you out.
Method 1. Use Another Device
The most convenient and effective way to screen record protected videos without black screen on mobiles is to record with other device having a camera.
Step 1. Prepare a camera device with recording feature, be it a phone, a pad, a GoPro etc.
Step 2. Play the video you want to record. Open the camera on the extra device and start recording.
Step 3. Stop recording when the video ends. Edit the recording to make it better for watching.
In fact, the recording file probably features a bad quality and viewing experience. And, you must film the video by holding the device until the video ends. If you want to get a perfect recording, try the following two methods.
Method 2. Use Zoom Screen Sharing Function
Design as an intelligent platform for video communication, Zoom provides a screen sharing feature to share the content across device. You can share the protected videos from your iOS/Android devices to the desktop and then record to unblock black screen.
What you should prepare before screen sharing:
- Zoom app on your mobile
- Zoom app on your desktop
- A Zoom account
Then, follow the steps to share your screen using Zoom.
Step 1. Open Zoom app and log in your account on your mobile and desktop app.
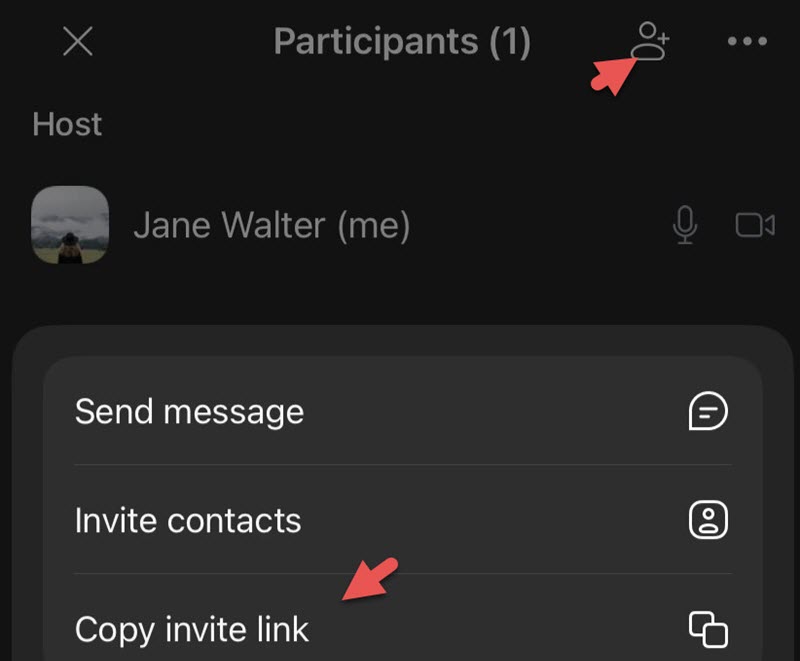
Step 2. Start a new meeting on your mobile. Tap Participant > the person icon > Copy invite like.
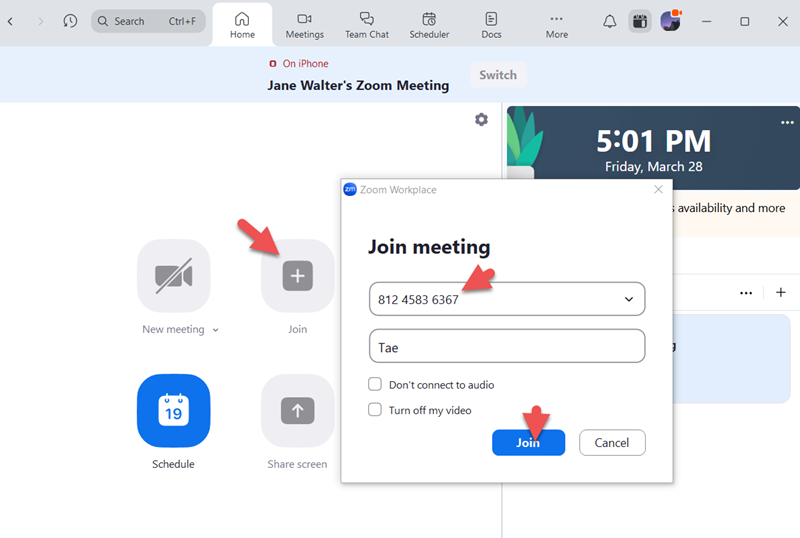
Step 3. Open Zoom on your desktop. Click Join. Paste the copied the link into the Message ID box. Input your name. Click Join.
Step 4. Go back to your mobile. Click Share > Screen > Start Broadcast.
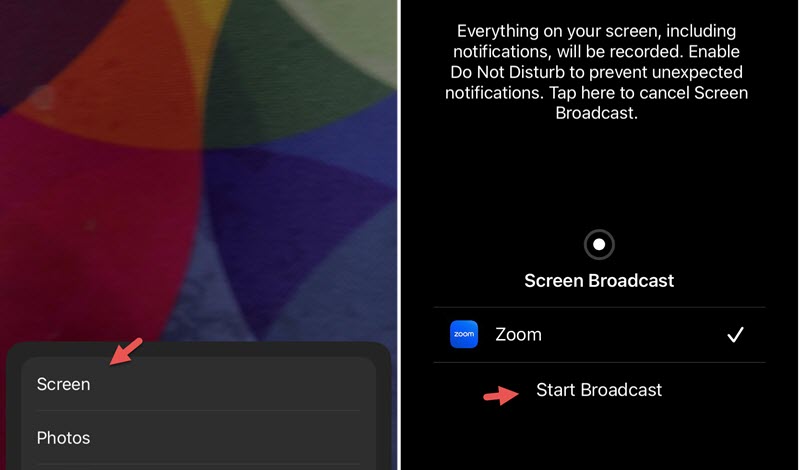
Step 5. Swipe up to show your screen and play the protected videos you want to record. Now, you can watch the shared content in Zoom desktop app.
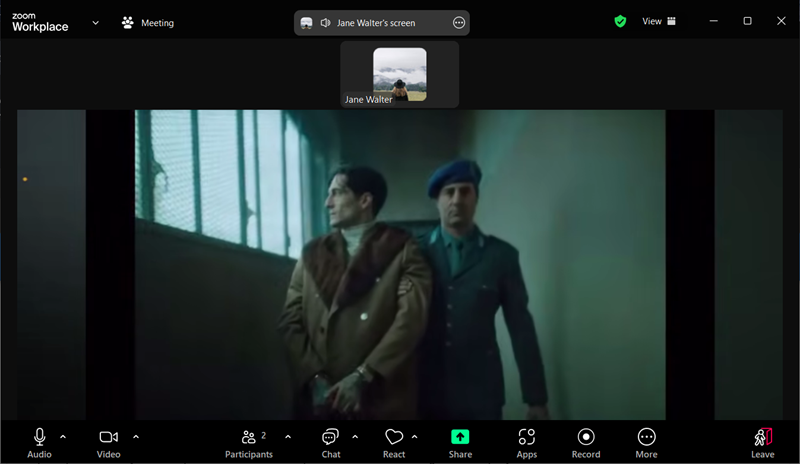
Step 6. Use a recorder to screen record the protected videos, no black screen issue happening.
Also Read: How to Record a Zoom Meeting with or Without Permission >>
Method 3. Mirror Your Phone Screen to PC
It is a bit complex to use Zoom screen sharing for protecting protected videos on your mobiles. Mirroring your phone screen to PC for recording can be a much easier way. If you are trying to screen record protected videos without black screen on Android and iPhone, give iTop Screen Recorder a chance again. It adds a device recording feature to cast your phone to PC and record videos playing on your phone at one stop, no black screen issue appears. You can also enjoy no-lag recording performance and export a clear video for offline watching.
Step 1. At the start, please download and install iTop Screen Recorder on PC.
Step 2. Launch iTop Screen Recorder > Device. Select iOS or Android according to your device. Then, follow the on-screen instruction to connect your phone to PC.
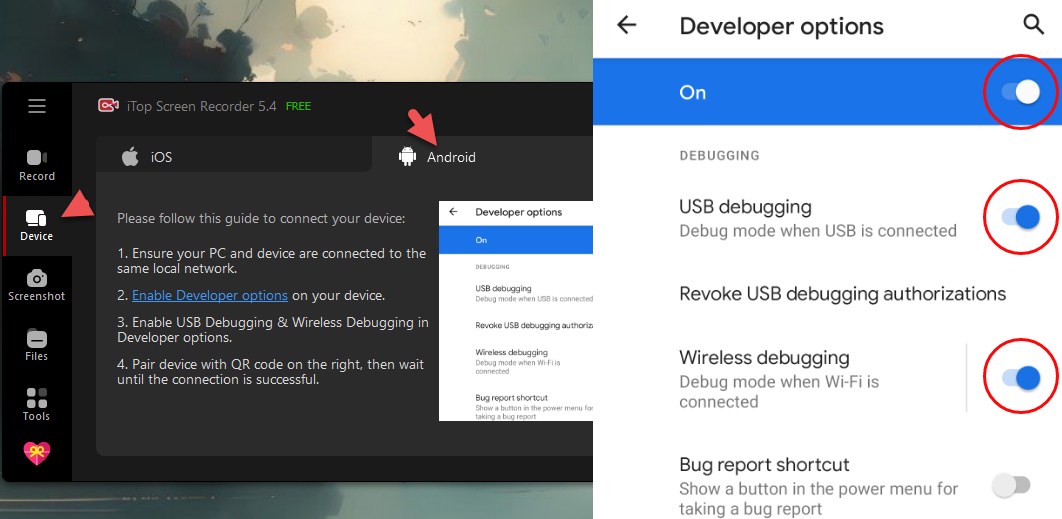
Step 3. After it successfully connects, play the protected video you want to record on your phone. Then, press Ctrl on your keyboard and click REC button at the same time to ensure that you can bypass black screen block and other restriction when screen record DRM protected videos on your device.
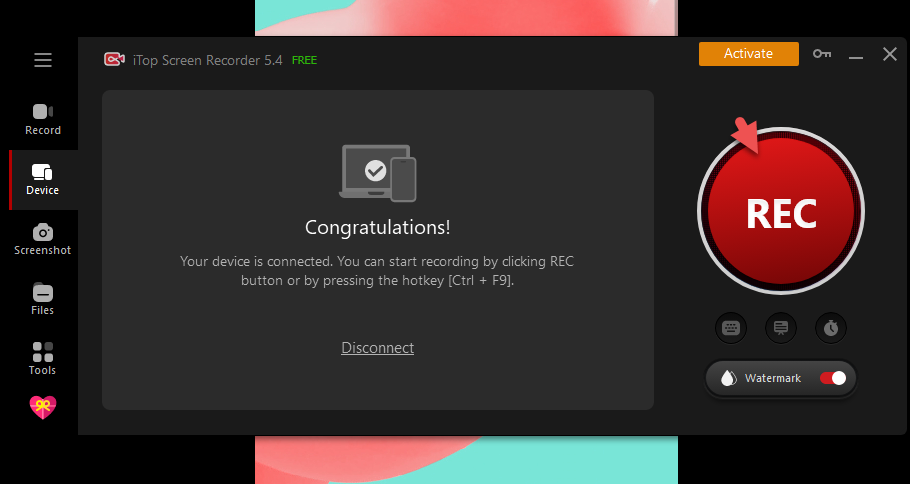
Step 4. Click the Done button to stop recording. Open iTop Screen Recorder again and click Disconnect to stop screen mirroring. The recorded video is automatically saved to Files > Video. You can directly play or edit the video on your computer or transfer it to your mobile devices for watching anywhere anytime.
Also Read: How to Record Your iPhone Screen on Windows PC >>
Conclusion
Whether you want to screen record protected videos on Windows or capture protected videos on iPhone, iTop Screen Recorder can cut the mustard. It enables you to record 4K UHD/1080p 60fps HD protected videos easily without lagging or fps drops. The tool can easily bypass the restrictions and screen record protected videos without black screen issue. Or you can check how to screen record without black screen for protected videos on Mac. All this can be done without the help of other devices or apps. Free download the screen recorder that bypasses black screen to create flawless screen recordings on your PC, Android and iPhone.
 Vidnoz AI creates engaging videos with realistic AI avatars. Free, fast and easy-to-use.


