PowerPoint slides are regarded as an essential element for presentations. A high-quality PowerPoint that effectively transmits the message can often brighten up a display, debriefing, etc.
A new recording experience - to record PowerPoint as video - can break the geographical and time limitation. You can easily create and share videos of the presentations to impart information efficiently in your own way, which is effective for business presentations, student group discussions, etc.
This article offers 3 ways to record PowerPoint to video. Read on to choose the one that suits you best!
Record PowerPoint as Video through MS Internal Function
Using the internal features of Microsoft PowerPoint, you can save PPT slides directly to video format. Of course, this method is highly time-saving. The video is generated automatically and instantly; no need to wait.
However, the interval between each slide is required to be set in advance and is fixed, it is not convenient if you want to insert some explanatory content, and there is no editing tool to personalize your video.
Let's see the following steps to record PowerPoint to video through the internal feature.
Step 1. Choose the file you want to record.
Step 2. Select File > Export > Create a video.

Step 3. Customize your settings. You can choose video quality and Seconds to spend on each slide.
Step 4. Click Create Video and your video is now in production.
Record PowerPoint as Video through MS Internal Recorder
The MS built-in recorder provides more editing features than the first method. Apart from more accessible and convenient slideshow recording, it supports recording and annotation.
Let's see the following step to record PowerPoint as video through MS internal recorder.
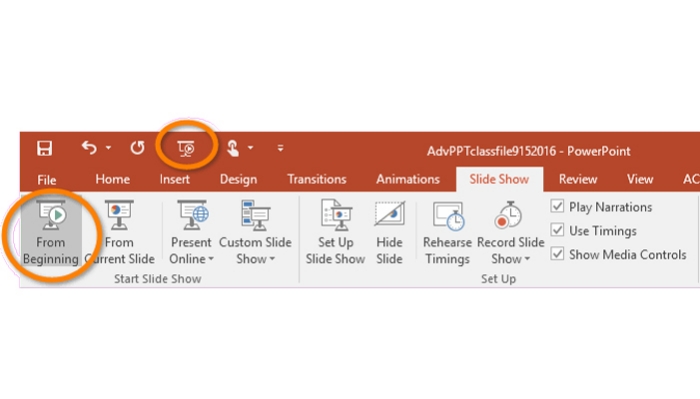
Step 1. Select Slide Show > Record Slide Show. You can choose Start Recording from Current Slide or Start Recording from Beginning. (PS: Please make sure your ppt file is kept in pptx format.)

Step 2. A recording window will pop up, and you can add audio or video narration by toggling the relevant icon in the screen's lower right corner and then hitting Start Recording.

During recording, you are allowed to interact with the audience and make your presentation more engaging with the provided annotation tools. On the floating bar, pause and end can be done at any time.
Step 3. Once finished, you can select File > Export > Create a Video. In addition, you can choose Ultra HD (4K) for the best video quality.
As mentioned above, the Microsoft built-in recorder can provide more operational features, but its functions are still relatively limited; for example, it does not have a webcam function. Therefore, a professional recorder is a better choice for more demanding users.
Record PowerPoint to Video with Third - Party Screen Recorder
Compared with the default screen recorder of Microsoft PowerPoint, a third-party recorder is far more powerful. iTop Screen Recorder, one of the most powerful PowerPoint recorders for Windows users, could be a great helper for you to record screens and edit videos in PowerPoint.
What Makes the Best PowerPoint Recorder:
- Built-in video editing tool. iTop Screen Recorder offers a professional self-contained video editor that allows users to trim, cut and split the captured video.
- No lag recording experience. Thanks to its higher CPU utilization, iTop Screen Recorder enables smoother screen recording with no lag.
- Webcam & audio recording. The powerful utility supports facial camera recording, a perfect fit for adding narration to your PowerPoint.
- Multiple output formats. You have multiple video output options, including MP4, WMV, AVI, MOV, MP3 and GIF, which makes your PowerPoint videos more accessible to your audience.
-
Flexible screen recording. You can choose to record part of screen or full screen high-quality video (4K definition).
Next, is a tutorial demonstrating how to record PowerPoint as video with the help of iTop Screen Recorder.
Step 1. Tap the Download below and install the best PowerPoint recorder.
Step 2. Set your preferences.
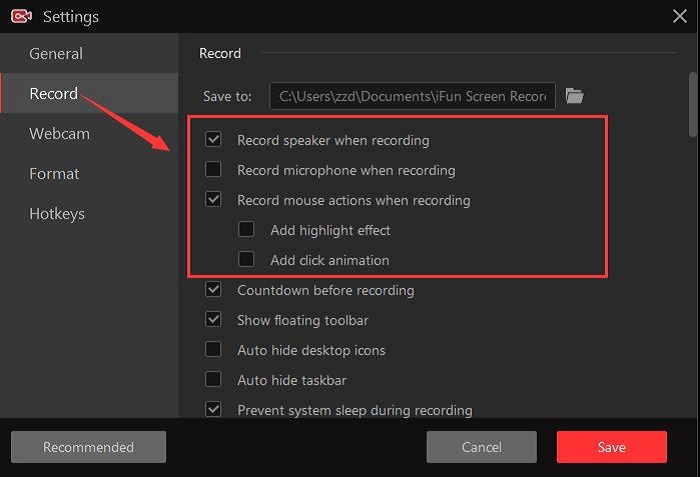
Once you have followed the on-screen instructions to complete the download, you can set the recording options to suit your needs, video format, quality, screen size, etc. Also, if you want to add an oral demonstration to your PPT, you can select Record Microphone when recording.

Step 3. Record PowerPoint as video
Run your PowerPoint in advance. Click on the red button "REC" to start recording. In the floating bar, you can use the annotation tool to highlight what you want to emphasize. In addition, the footage taken by your webcam will be displayed on the screen as if you were giving a video presentation.

When you're done, click the Finish button and find your PowerPoint video recording under the My Creations tab. Right-click on the video to expand the menu where you can preview, edit, upload or delete the video as you wish.
Mac users can go to the official website of iTop online screen recorder to record PowerPoint as video.
Final Words
Video is the most direct and effective way to share information. You can better achieve information sharing by integrating ppt and narration and converting them into video.
This article offers 3 effective ways to record PowerPoint as video. If you have higher requirements for PowerPoint recording, iTop Screen Recorder would be a good choice as it has more valuable features required for advanced users to record PowerPoint. Moreover, it is a free screen recorder.
Come and download it and see for yourself!
 Vidnoz AI creates engaging videos with realistic AI avatars. Free, fast and easy-to-use.


