 Vidnoz AI creates engaging videos with realistic AI avatars. Free, fast and easy-to-use.


Surface Pro, a line of Microsoft Surface series, introduced the first 2-in-1 laptop in 2013, combining laptop power and tablet versatility. Fast forward to 2024, the new AI-powered Surface Pro 11 is now available. This latest model features Qualcomm's new Snapdragon X Plus and Elite chips, promising a major performance boost over other system-on-a-chips. As users adapt to this cutting-edge device, knowing how to screenshot on Surface Pro becomes essential. In this article, we will show five ways to take a screenshot on the Surface Pro 11 and its previous models, ensuring you can effortlessly document and share your screen.

How to Screenshot on Surface Pro 11 etc., Without Keyboard
If you use Surface Pro as a tablet without keyboard, here’s how to screenshot on Surface Pro without keyboard.
Step 1: Press and hold the Power button and the Volume Up button simultaneously.
Step 2: You will see the screen dim briefly, indicating that a screenshot has been taken.
Step 3: The screenshot will be automatically saved to the Screenshots folder within the Pictures library.

To access the screenshot, open the Photos app or navigate to the Screenshots folder in the File Explorer. From here, you can edit, share, or move the screenshot as needed.
How to Screenshot on Surface Pro 11 etc., with Keyboard
If you have connected a keyboard to your Surface Pro, you can use the Print Screen key to take a screenshot. Here are the steps on how to screenshot on Surface Pro with keyboard:
Step 1: Press the PrtScn (Print Screen) key on your keyboard. This will capture the entire screen.
Step 2: To capture only the active window, press Alt + PrtScn. This will capture just the window currently in focus.

Step 3: The screenshot will be copied to your clipboard. Open an image editor like Paint or a document editor like Word.
Step 4: Press Ctrl + V to paste the screenshot into the application.
Step 5: Save the screenshot from the application by selecting File > Save As and choosing your preferred format and location.
Also Read: How to Screenshot on Windows Without Print Screen >>
How to Screenshot on Surface Pro 11 etc., with Snipping Tool
Snipping Tool is an inbuilt screenshot and screen recording tool for Surface Pro 11 and other models running Windows 11/10. It offers flexible options for capturing your screen, whether it’s a full screen, a specific window, or a custom area.
Here's how to take a screenshot on Surface Pro using Snipping Tool:
Step 1: Open the Snipping Tool by searching for it in the Start menu.
Step 2: Click on New to start a new screenshot.

Step 3: The screen will dim, and you will see a cross-hair cursor. Select the type of snip you want: rectangular, free-form, window, or full-screen.
Step 4: Click and drag to capture the area you want to screenshot.
Step 5: Once captured, the screenshot will appear in the Snipping Tool editor. Here, you can annotate, highlight, or erase parts of the screenshot.
Step 6: Save the screenshot by clicking File > Save As, and choose your preferred format and location.
Also Read: How to Use Snipping Tool Screen Recording on Windows 11 >>
How to Take a Screenshot on Surface Pro 11 etc., with Game Bar
Game Bar is designed to capture game clips on Windows 10 and 11. In addition, it enables you to take screenshots in games or applications on Surface Pro.
Step 1: Press Win + G to open the Game Bar overlay.
Step 2: If this is your first time using Game Bar, you may need to enable it by navigating to Settings > Gaming > Xbox Game Bar and toggling it on.
Step 3: Once Game Bar is open, click on the Camera icon in the Capture widget to take a screenshot.

Step 4: The screenshot will be saved automatically in the Captures folder, which can be found in the Videos library.
Once you finish how to screenshot on Surface Pro with Game Bar, you can access the screenshot from File Explorer > This PC > Videos > Captures.
How to Screenshot on Surface Pro 11 etc., with 3rd Party Screen Recorder
For anyone searching for a versatile and effective screenshotting experience, using a third-party screen capture tool is the ultimate choice. iTop Screen Recorder is a professional screen recorder and screenshot tool that allows you to capture anything on your Surface Pro laptop.
This versatile tool offers several features to enhance your screenshot-taking experience:
- Flexibly select the area for a screenshot: iTop Screen Recorder allows you to flexibly select any area of your screen to capture. You can choose to take a partial screenshot by clicking and dragging to select the area ensuring that you capture exactly what you need as well as capture full screen.
- Screenshot a specific window: With iTop Screen Recorder, you can easily screenshot a specific window. This is particularly useful if you want to capture content from a single application without including other elements on your screen.
- Take a full-page screenshot: iTop Screen Recorder also enables you to take full-page screenshots, capturing the entire content of a webpage or document as an image, even if it extends beyond the visible screen. This feature is perfect for saving long articles, reports, or web pages in one complete image.
- Create a high-quality screenshot: iTop Screen Recorder ensures that your screenshots are of high quality. It captures images with high resolution and clarity, making sure that all details are preserved, whether you are capturing text, images, or graphics.
- Drawing tools for screenshots: The tool comes equipped with drawing tools that allow you to annotate your screenshots. You can add text, arrows, highlights, and other markings to emphasize important parts of your capture, making it easier to convey your message or highlight specific information.
Steps to Screenshot on Surface Pro Using iTop Screen Recorder
Step 1: Download and install iTop Screen Recorder on your Surface Pro.
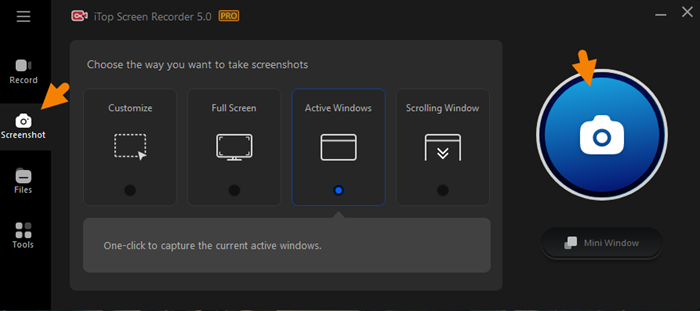
Step 2: Launch it and select the Screenshot feature from the left menu list.
Step 3: Choose the type of screenshot you want to take, then hit the blue Capture button.
- For a flexible area, click and drag to select the desired portion of your screen.
- To capture a specific window, select the window you want to screenshot.
- For a full-page screenshot, choose the option to capture the entire content of the page.
Step 4: Use the built-in editing tools to annotate your screenshot if needed. You can add text, arrows, shapes, and highlights.
Step 5: Click Save to save the screenshot to a folder. Or, copy and paste it to a message app for sharing instantly.

Conclusion
How to screenshot on Surface Pro? There are several methods to take a screenshot on the Surface Pro 11 and previous models, both with and without a keyboard. While the built-in screenshot features and programs are useful, they have some limitations, such as only capturing the full screen or being unable to screenshot an entire page. To overcome these limitations, iTop Screen Recorder, the all-in-one free screen recorder and screenshot tool for PC is an excellent alternative. It offers a flexible and comprehensive solution for capturing screenshots, providing high-quality images and additional features like area selection, full-page capture, and annotation tools. With iTop Screen Recorder, you can enjoy the best user experience and performance for taking screenshots on the Surface Pro 11 without compromising on quality.


