Designed and manufactured by Microsoft, Surface Pro runs a 64-bit version of the Windows 8 Pro OS, with a free upgrade option to Windows 8.1 Pro, and eventually Windows 11. It is 2-in-1 detachable tablet similar to a Microsoft laptop, so many people use it for work and study. But some people have a question about how to screen record on Surface Pro. Don’t worry. Here this blog will show you a step-by-step guide to screen record on Microsoft Surface Pro in 3 simple ways. Please keep reading!

Screen Record on Surface Pro Using Free Screen Recorder
It is really convenient for people to use Surface Pro for study and work. So how to screen record on Microsoft Surface Pro? iTop Screen Recorder is a good choice for you to screen record on Surface Pro easily. This screen recorder is a professional and reliable application, the free version of which offers various useful features (such as screen recording with no lag, capturing screens, editing videos, and so on) to meet most needs.
Benefits of Using iTop Screen Recorder to Screen Record on Surface Pro
Record Any Area of Your Screen on Surface Pro
iTop Screen Recorder provides several recording options: Full Screen, Select Region, Select Window, and Fixed Ratio. So, you can record a part of your screen or a full screen as you need.
Record Screen with Audio on Surface Pro
This screen recorder allows you to screen record on Surface Pro with computer audio and microphone at the same time.
Screen Record Surface Pro Without Time Limit
You're allowed to keep recording your video as long as possible, and you won't be disturbed when working on important tasks, or anything else.
Record Screen Only or Record Screen and Webcam Simultaneously
Whether you want to record the screen only or record the screen and webcam simultaneously on your PC, iTop Screen Recorder can help you do that easily.
Beautify Recorded Content on Surface Pro via Free Video Editor
This screen recorder has an inbuilt video editor that you can use to add stickers, text, effects, transitions, and filters to your videos.
How to Screen Record on Surface Pro with iTop Screen Recorder?
Before starting to screen record on Surface Pro, please ensure that all your devices (such as microphone and webcam) are ready. Then, follow the steps below to screen record on Surface Pro:
Step 1: Download iTop Screen Recorder and follow the on-screen instructions to install it on your Surface Pro.
Step 2: Open iTop Screen Recorder and choose the screen region you want to record. Then, turn on Speaker/Mic/Mouse/Webcam (as your needs) > click the REC button to start recording.

N/A means that your related device isn’t installed or connected to your Microsoft Surface.
Step 3: Hit the F9 key to finish recording, and you can find the video via My Creations > Video. Then, right-click the video to preview, edit, compress, rename, delete, and open the file location.

Now can you screen record on Surface Pro? The way to screen capture on Surface Pro with iTop Screen Recorder is quite simple and easy.
Screen Record on Surface Pro with Online Screen Recorder
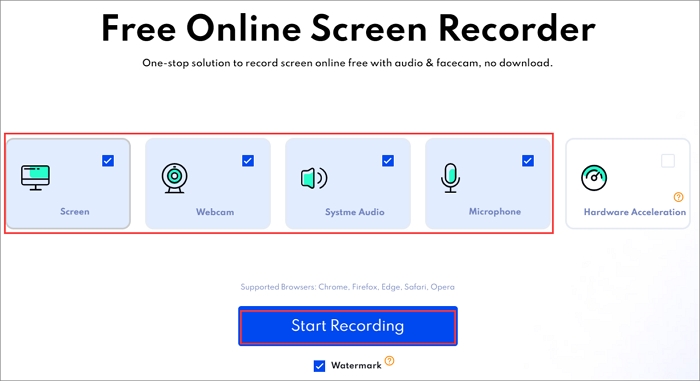
iTop Online Screen Recorder is a great screen recorder for Surface Pro. It is a good way for those who dislike installing any software to screen record on Surface Pro. This online screen recorder offers you four options to choose and record your screen as you need. Here is a guide to do that:
Step 1: Go to the Online Screen Recorder page in your browser.
Step 2: According to your needs, tick Screen/Webcam/System Audio/Microphone and then click Start Recording.

How to Screen Capture on Surface Pro with Game DVR
Starting with Surface Pro 6, subsequent devices can all be upgraded to Windows 11. When your Surface Pro is running Windows 10 or later, one of the biggest advantages is that you don't need to search or download other third-party software. In this case, you can use the built-in Game DVR to screen record on Surface Pro. Here is how to do that:
Before launching the Game DVR, you need to connect a keyboard to your Surface Pro device.
Step 1: Press the Windows + G keys combination on the keyboard to access the Game DVR.
Step 2: Open what you want to record on your Surface Pro. Turn on/off the Microphone depending on your needs, and then press Windows + Alt +R on your keyboard.

Step 3: Click the Stop button or repeat the Windows + Alt + R keyboard shortcut to stop recording.
You can click See my captures to view your videos when recording is done.
Comparison of Different Surface Pro Screen Recorders
|
Supported Formats |
Recording Quality |
System OS |
|
|
iTop Screen Recorder |
MP4, AVI, MKV, MOV, FLV, TS, and GIF |
4K, 1080p, and 720p |
Windows 11/10/8.1/8/7 |
| Online Screen Recorder | MP4, WMV, and AVI |
For up to 1080p |
Windows and Mac |
|
Game DVR |
AVI and MP4 |
For up to 1080p |
Windows 11/10 |
FAQs on How to Screen Record on Surface Pro
1. How to Record Full Screen on Surface Pro?
To record full screen on Surface Pro, iTop Screen Recorder can help you to do that. Here is a step-by-step tutorial to tell how to record full screen with this screen recorder:
Step 1: Open iTop Screen Recorder and choose Full Screen in its interface.
Step 2: Click the REC button on the right side of the panel to start recording the full screen.
Step 3: Press the F9 key on the keyboard, and then go to My Creations to view your recordings.
Besides, iTop Screen Recorder has a built-in free video editor, so you can also use it to edit videos if needed.
2. How to Screen Record on Surface Pro via Microsoft Stream?
Microsoft Stream is one of the many applications included in a Microsoft 365 subscription. It allows you to make, manage and share videos. So, how to screen record on Surface Pro via Microsoft Stream? You just need to launch Microsoft Stream and then click Create > Record screen. Besides, if you have any questions about using Microsoft Stream, you can learn more details from this blog: How to Use Microsoft Stream Screen Recorder >>
3. How Long Can the Game DVR Screen Be Recorded?
The Game DVR's recording time is set to 2 hours by default, but you can also change it to 30 minutes, 1 hour, or 4 hours. In the Game DVR settings, you can see the option to record the microphone during gameplay, and below that, you can choose to capture video at 30 or 60 frames per second.
The Bottom Line
That's all about how to screen record on Surface Pro. Using a professional third-party screen recorder such as iTop Screen Recorder can help you screen record on Surface Pro easily. In addition, this screen recorder can also help you run auto-ending recording at a scheduled time and more. Now try this free screen recorder right away!
 Vidnoz AI creates engaging videos with realistic AI avatars. Free, fast and easy-to-use.


