If you want to generate YouTube to GIF to share memorable moments, it’s a pity that copyright restrictions can hinder your process. Moreover, GIFs will likely appear pixelated or blurry due to the limitations of GIF format color palettes and compression techniques. Despite these challenges, this post offers 6 easy ways to help you turn YouTube video into GIFs easily in high quality.
Part 1. HD YouTube to GIF by Screen Recorder
Most third-party YouTube to GIF converters often result in blurry GIFs or add unwanted watermarks to your creations. iTop Screen Recorder offers a reliable solution to bypass these limitations and generates high-quality GIFs directly from YouTube. It captures YouTube videos on a full screen, fixed ratio, or selected window in GIF format, with customized settings like size, FPS, quality, and more.
With an advanced video editor built into the GIF screen recorder, you can add filters, effects, text, stickers, etc. to polish your YouTube GIF. It has direct access to upload your YouTube GIF to Facebook, Instagram, Vimeo, Google Drive, and other platforms.
How to use iTop Screen Recorder to do YouTube to GIF?
Step 1. Free download iTop Screen Recorder, install and run it on your PC.
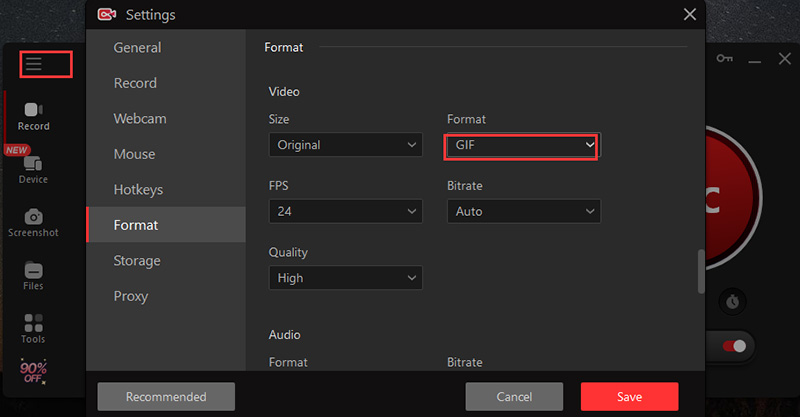
Step 2. Click the “Options” icon at the left top corner and select “Settings” from the drop-down menu. Click “Format” and choose “GIF”, then click the “Save” button.
Step 3. Go back to the main interface, set the recording area, and then open the YouTube video you want to create GIFs from. Click the “REC” button to start generating YouTube to GIF.
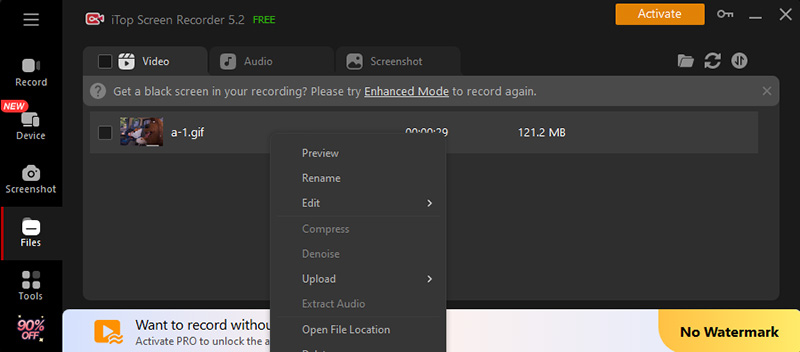
Step 4. Locate your GIFs under “Files” >” Video”. Right-click the YouTube GIF to preview, edit, upload, etc.
Part 2. How to Convert YouTube to GIF with Links?
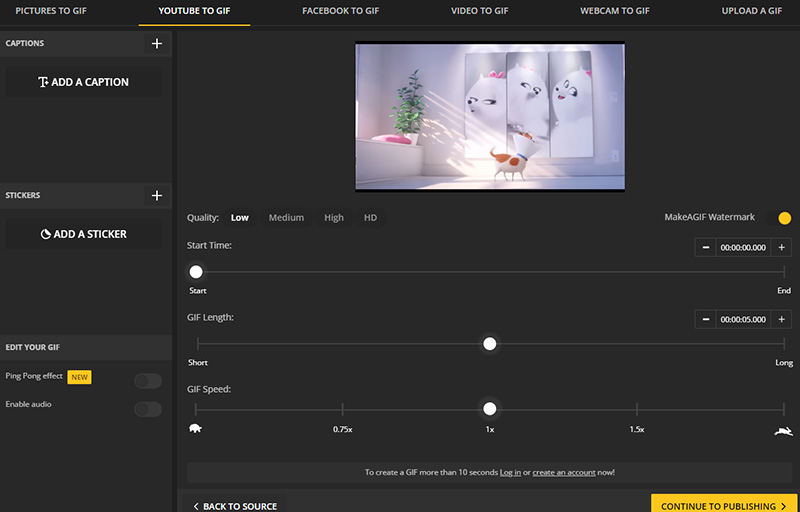
How to download YouTube videos without any software and then turn them into GIFs? It’s possible to download and turn YouTube into GIFs with links directly via Makeagif. With Makeagif, you are free to adjust the quality, start time, length, and speed of the output GIFs.
However, it puts a watermark on the GIFs for free users. The final GIFs see noticeably decreased quality due to the compression. Use the following steps to turn YouTube clip into GIF with the online YouTube video downloader and GIF converter.
Step 1. Head to Makeagif YouTube to URL page and enter the YouTube URL you’d like to create your GIF from. Click the “CONTINUE TO EDITING” button at the bottom to process the YouTube video.
Step 2. Set the “Quality”, “Start Time”, “GIF Length”, and “GIF Speed”, then click “CONTINUE TO PUBLISHING”.
Step 3. Name the GIF and add tags. Click “CREATE YOUR GIF” to complete the GIF creation process.
Part 3. YouTube to GIF - Fully Unblocked Online Converter
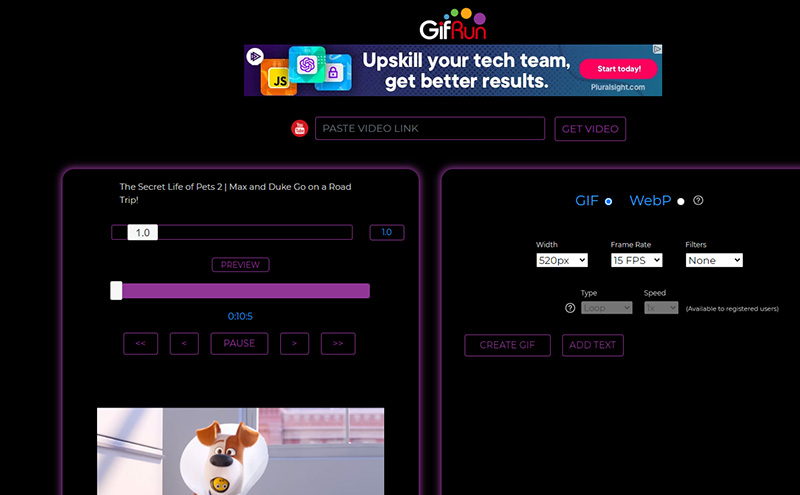
Some YouTube uploaders block third-party media players, so an unblocked YouTube to GIF converter like GifRun is needed. GifRun is also a straightforward online service, allowing you to convert YouTube video to GIF with flexible settings. Personalize your GIF by adjusting its size, and speed, and add stylish filters in GifRun. You can add text to a GIF to spice it up or crop it to focus on the action.
Be cautious of the download button, as it redirects you to other software. The exported GIFs also contain a watermark for free users. The output GIF quality is compromised. Here’s how to generate YouTube to GIF online free with GifRun.
Step 1. Copy and paste the YouTube video URL you want to convert into the designated field on GifRun.
Step 2.Once the video is loaded, adjust the GIF's width, and frame rate, and apply filters, text, or cropping to tailor it to your preferences.
Step 3. Review your customized GIF and click the "DOWNLOAD" button to save it to your device.
Part 4. YouTube to GIF with Highlight Moments
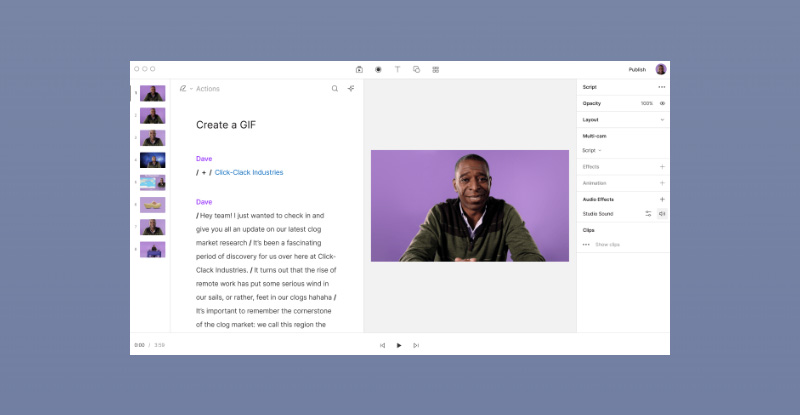
How to download a portion of a YouTube video and save it as GIF? If you want to extract specific moments from an uploaded YouTube video and convert them into GIFs, then Descript is exactly your thing. It creates and edits GIFs within on tool. Descript can speed up the selection of specific moments for your GIFs. It’s also easy to pinpoint the perfect section by editing GIFs directly through the transcript.
You'll need to register for a Descript account to convert YouTube to GIF. The free plan restricts exports to 720p resolution and includes a watermark. Additionally, the free tier offers basic AI features and limits access to just one hour of transcription per month.
Step 1. Open https://www.descript.com/tools/youtube-to-gif, and click Get Started. Import your YouTube video into Descript. You can either upload a downloaded video file or create a new video directly within the app.
Step 2. Identify the specific moments you want to turn into GIFs. Edit the selected clips as needed, adding captions, images, or other effects.
Step 3. Once your GIF is ready, export it in the desired format and quality settings. You can export individual GIFs or multiple GIFs in bulk.
Part 5. YouTube to GIF with Online Video Editor
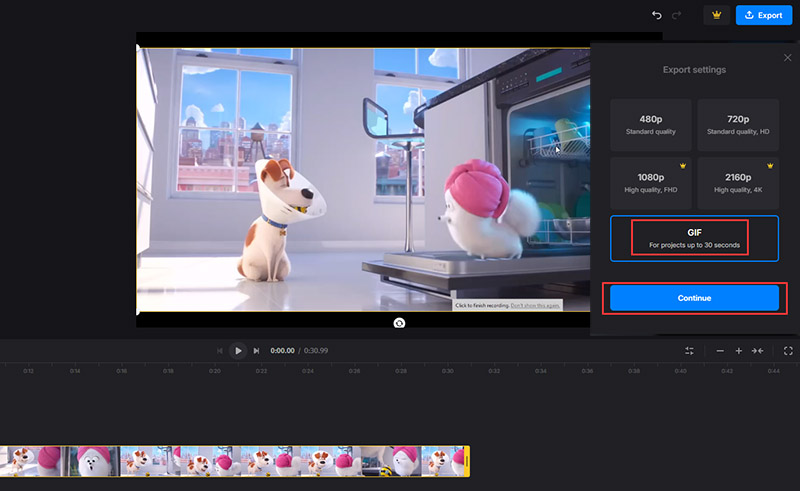
Online video editors like Clideo editor are preferred when you want more editing features for GIF making. Clideo is a fantastic online YouTube video editor that lets you transform your YouTube videos into eye-catching GIFs. Its editor lets you add effects, text, and transitions to personalize your GIFs. However, it only supports exporting projects a maximum of 30 seconds to GIF. A watermark is also included on the output GIF if you don’t subscribe. Learn how to convert YouTube to GIF with Clideo editor.
Step 1.Drag and drop the YouTube video you want to convert to a GIF. Make sure your YouTube video is shorter than 30 seconds.
Step 2. Edit your YouTube video, for example, add effects, transitions, text, flip & rotate, cut, and more.
Step 3. Click the Export button at the top and select “GIF”, then click “Continue”. Wait for the GIF conversion process to complete. Click the “Download” button to save the converted YouTube to GIF file.
Part 6. YouTube to GIF No Watermark
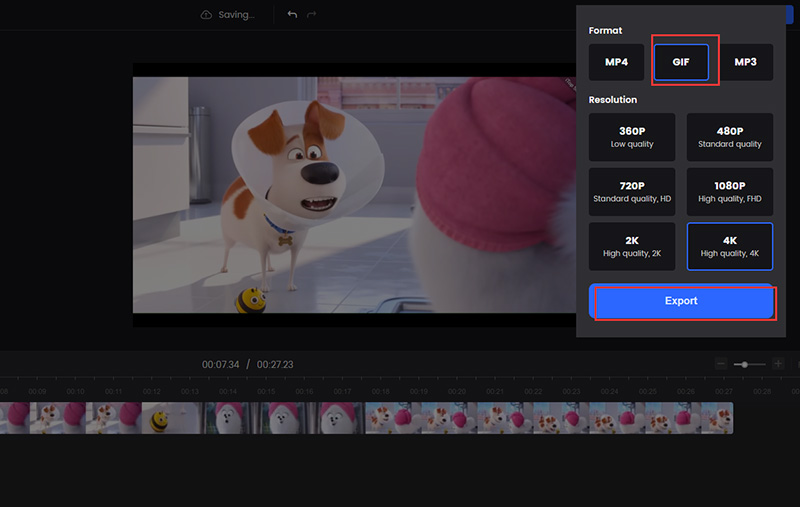
If you're looking to create high-quality GIFs without any watermarks, try the online video editor, Clippa. With Clippa, you can record YouTube videos and start the GIF project with text overlays, filters, etc. It supports exporting YouTube GIFs in high quality up to 4K UHD. But it’s not perfect – you'll need to create an account to use Clippa's features. The GIF export process may take some time. The maximum resolution of the output GIF fails to reach true 4K UHD. Anyway, follow the below guide to converting YouTube to GIF no watermark.
Step 1. Sign up for a free Clippa account to access its features. Log in to your account and import the YouTube video into Clipppa editor's main interface.
Step 2. Use the online editor to trim the video and add effects, text, filters, etc.
Step 3. Click the "EXPORT" button, choose the “GIF” format, and select export quality. Click the “Export” button to start the YouTube video to GIF conversion.
It’s also the same to save Reddit video as GIF or convert to GIFs from other online videos.
Part 7 Conclusion
There are many online services for quick and simple YouTube to GIF creation. But their limitations in terms of watermarking and output quality are not ideal for high-quality GIF generation. iTop Screen Recorder, a versatile YouTube video recording, GIF maker, and editor, comes to the rescue for its up to 4K UHD resolution output and watermark free. Free download iTop Screen Recorder and turn YouTube video into GIFs effortlessly.
 Vidnoz AI creates engaging videos with realistic AI avatars. Free, fast and easy-to-use.


