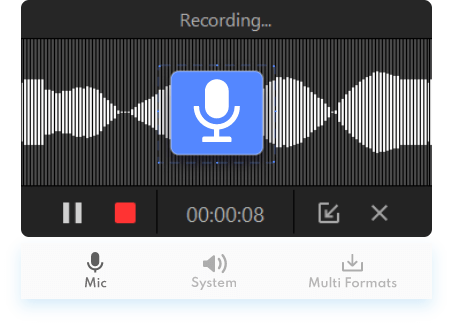
Are you experiencing screen recording no sound on your Windows device? It can be maddening to realize that there is no sound when doing screen recording. Nowadays video has become one of the most popular ways of conveying information. People use screen recording in many scenarios in their daily lives. Such as creating instructional videos, demonstrating software features, logging bugs, etc.
If you are experiencing the problem of screen recording audio not working, don't worry, you can find the appropriate solution in this article. You can take the following fixes in order to get your screen recording process back to normal. In the end, you can also learn about a more reliable method of screen recording, so let's get started.

Why Does My Screen Recording Have No Sound?
Many factors can cause screen recording no sound. At the top of the list are the following factors:
- Outdated Device Drivers – In this case, a simple update will fix the error.
- Incorrectly Configured Settings - If there is no sound from screen recording on Windows, it may be because you have not enabled the recording device you want to use.
- Disabled Audio Recording Permissions - If you screen record without sound, you can see if this permission is turned off. Turn it on to ensure that the system can record audio.
How to Fix Screen Recording No Sound on Windows 10/11
After understanding the causes of no sound on screen recording, you can try the following fixes to return your computer back to normal, let's take a look.
Fix 1. Enable Microphone/Recording Device
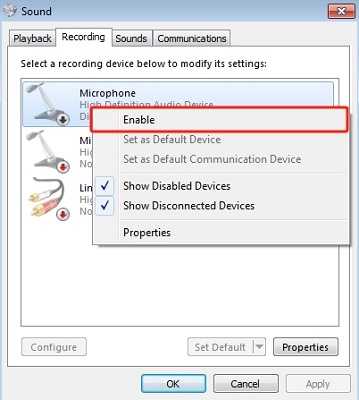
If the computer uses multiple recording devices, some of them may be disabled. This may cause problems with screen recording sound not working. To fix it, follow the steps below:
Step 1. Right-click the sound icon on the taskbar and click Sounds.

Step 2. Click the Recording tab at the top. Right-click your recording device and select Enable.
Fix 2. Update Your Drivers
Most common Windows errors and bugs can stem from faulty or incompatible drivers. Outdated drivers can cause delays, system problems, and even BSoD. Drivers are software that help the operating system communicate with hardware components and are usually the first thing to check. In most cases, using the built-in updater is a reliable way to update the driver.
Step 1. Press Windows + X together, select Device Manager from the menu.

Step 2. Click the arrow next to the Sound, Video, and Game Controllers option to expand it.
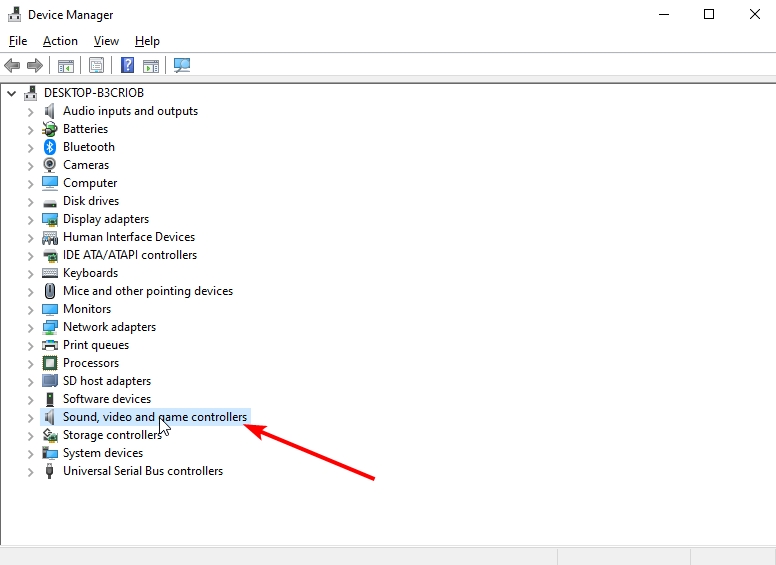
Step 3. Right-click on the driver and select Update driver.

Step 4. Click Search automatically for drivers.
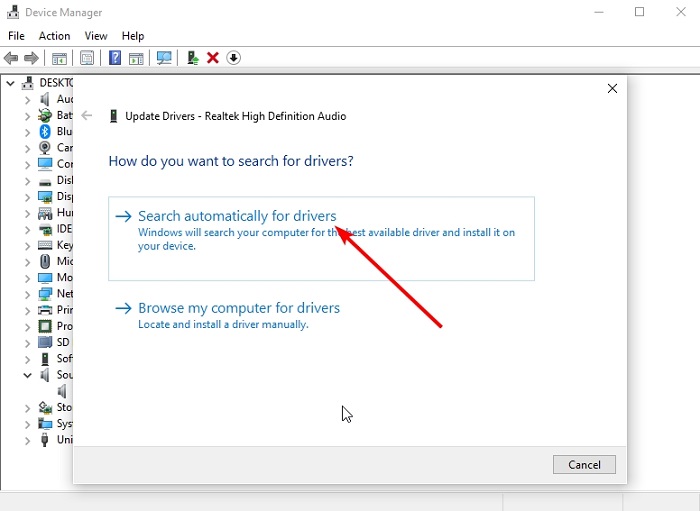
Step 5. Wait for the scan to complete and install the available updates.
Fix 3. Grant Audio Recording Permission
Privacy options give you more control over what data is shared and how you and other users access the installed hardware. One of these options is whether or not to allow access to the microphone.
If you disable this privacy feature, you may experience problems with Windows screen recording no sound.
Step 1. Press the Windows + I key together to open the Settings app. Scroll down and find Privacy option and click it.

Step 2. Click Microphone in the left pane and toggle the switch for Allow apps to access your microphone forward to enable it.
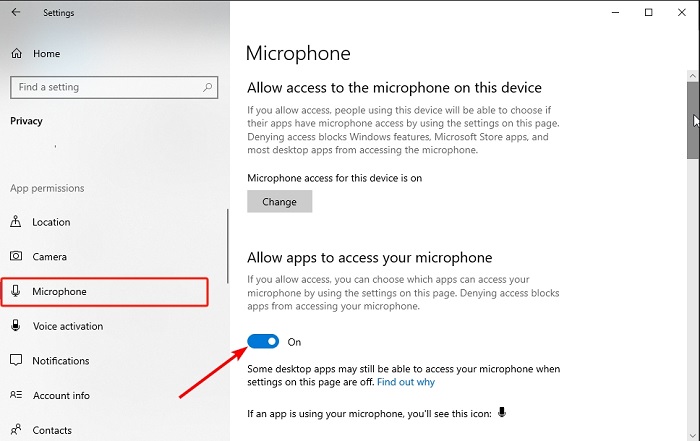
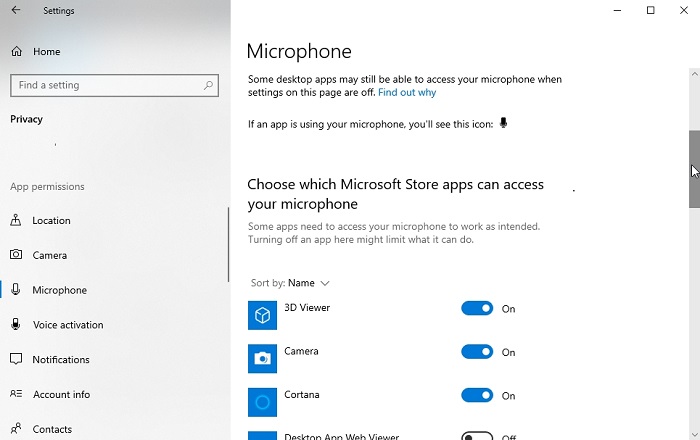
Step 3. Then, you can scroll down to control the apps that can access your microphone.
Fix 4. Select the correct recording device
If you are experiencing screen recording no sound issue, it may be because you have more than one recording device installed on your machine. Windows may not know which one to use, so you must manually select it as the default recording device.
If you switch between recording devices such as microphones and stereo mixes, you will have to change it every time you want to use one of the devices.
Step 1. Right-click the sound icon on the taskbar and click Sounds.
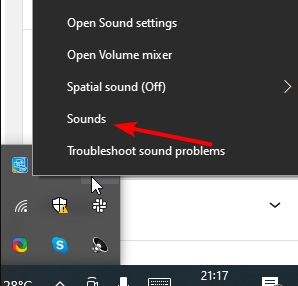
Step 2. Click Recording at the top and then right-click the recording device you have plugged in and choose Set as Default Device.

Step 3. Finally, click the Apply button and OK.
Fix 5. Run the Built-in Audio Troubleshooter
If after trying the above, there is still no sound on screen recording, try running Microsoft's dedicated Audio Recording Troubleshooter. This tool automatically detects and fixes audio issues that may be preventing you from recording sound on your computer.
Step 1. Press Windows + I to open Settings. Then select Update & Security.

Step 2. Select Troubleshoot in the left pane and click the Additional troubleshooters option on the right.

Step 3. Select Recording Audio and click Run the troubleshooter button and follow the onscreen instructions.

Try Different Recording Software for Smooth Screen Recording
After successfully resolving the issue of screen recording without sound, it is clear that a seamless recording experience is critical to your mission. To ensure consistency and reliability in recording your screen in the future, consider exploring other reliable screen recording software options.
iTop Screen Recorder stands out from the many recording products on the market. It offers a wider range of features to enhance your recording capabilities. By choosing it, you can optimize your workflow and create audio and video content efficiently and accurately. Let's see what it can offer you.
Full-Featured Screen Recorder with 4 Recording Modes
This free screen recorder offers 4 modes to record audio, screen, webcam and games easily and quickly. You can choose to record screen activity while recording yourself via webcam.
Flexibility to Record and Change Sounds
This free screen recorder supports you to record speaker, microphone or system sound. It is also a voice changer recorder, you can also change your voice while recording your own voice with the microphone, such as changing from male to female.
Powerful Audio and Video Editor
This screen recorder for Windows 10 has a built-in video editor. After recording a video, you can go directly to the editor to edit it, or you can use the editor alone to edit any video. Such as cropping, splicing, adding background music to the video, and so on.
Handy Video Converter and Compressor
This software has its own compressor to help you save the size of the space occupied by the video or audio. You can also use its converter directly to convert formats, such as extracting audio from videos.
Let’s see how to do screen recording with audio via iTop Screen Recorder.
Step 1. Download and install iTop Screen Recorder for your device.
Step 2. Set preferences to record Windows screen.
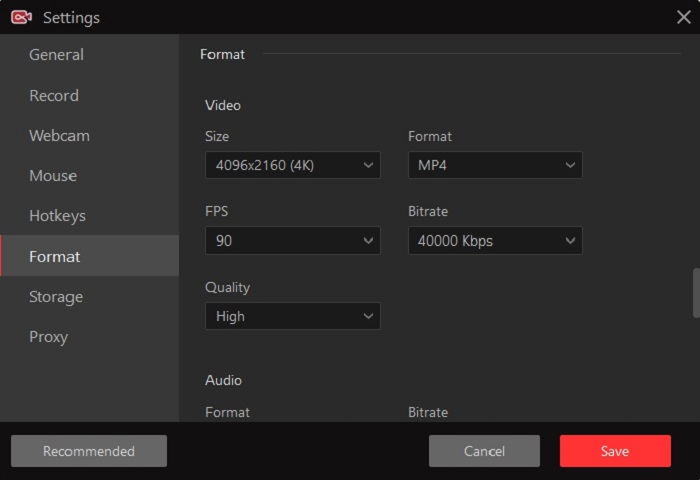
Launch iTop Screen Recorder. Go to Settings and customize if necessary. For example, if you want to adjust the video parameters, click Format > Video, and then you can set the Size (resolution), Format, Frame Rate, Bit Rate, and Quality.
Step 3. Start recording screen on your device.
In the Record tab, click the drop-down arrow to select the recording area. Then select the sound you want to record on the right. Click the red REC button when the settings are complete.

There is a mini control bar during recording. You can use arrows, shapes to highlight content or add text as comments during recording. Recorded files are automatically saved in File > Video. You can click the Edit button to launch the video editor to customize your video file.
The Bottom Line
This article provides you with five fixes for screen recording no sound. Hopefully, you'll be able to get your device back to normal. After the fix is done, we also suggest you to use a more professional screen recording software to create audio or video.
iTop Screen Recorder recommended in the article will be your right choice. With its comprehensive features and simple page, even newbies can get started quickly. Download this HD screen recorder now to use it to record your screen in Windows and share the content with others.
 Vidnoz AI creates engaging videos with realistic AI avatars. Free, fast and easy-to-use.


