Share screen on Zoom is a very useful trick. Get the hang of it and you will be effective in remote communication in Zoom. Now, it’s an essential part of our lessons since more people are now working from home and meeting remotely.

Zooms works on different operating systems and how to share the screen is different in each. We will discuss how you can share the screen in the majorly known environments and also address some of the common problems that people face as they try to share screen on Zoom.
Keep reading to see how easy it is and how you can record the Zoom screen share.
- This is an Article Index.
- Do not insert any text in here.
- This index will be generated automatically when displayed on the front end.
- Of course we still love you.
Can You Share Zoom Screen Without Permission?
The host or those participating cannot see your screen if you have not shared or granted permission. If you just joined a meeting, others in the virtual meeting will only see your video and hear your sound if you have not muted the microphone.
If you would like to share your screen, then you have to use the ‘Share Screen’ feature. So, until you share it, Zoom will not allow screen viewing.
Click to see: How to Record Google Meet Session? >>
How to Share Screen on Zoom MacBook/Windows OS?
If you are using your Windows PC or MacBook, then you can check how to share screen on Zoom. How to share screen on Zoom MacBook and Windows is pretty the same thing. So, the steps below will guide you through both operating systems.
Step 1: Open up Zoom on your computer and ensure you are signed in to continue.

Step 2: There will be several options on the main page. They will include hosting a meeting or joining one. Tap on the ‘Share Screen’ option.
Step 3: There will be a prompt asking you to input your meeting ID or the sharing key. Input the ID or key in the input box provided. You screen will become immediately shared with the others in the meeting.

- Sharing a Screen on Zoom While in a Meeting
Step 1: Join the meeting or start it if you are the host.
Step 2: Go to the meeting controls where you see the start and stop icons among others. Click on the ‘Share Screen’ icon which is green in color.
Step 3: Click on the screen you want to share on your computer to select it. After that, click ‘Share’.
How to Share Screen on Zoom iPhone/iPad?
Are you using Zoom on iPhone? Then here is how to share screen on Zoom using your iOS device. It’s quite different but here is how you go about it:
Step 1: Before you begin screen sharing, you have to set up some things first. Visit the settings app and tap on ‘Control Center’ and proceed to ‘Customize Controls’.
Step 2: Find the ‘Screen Recorder’ option and tap the green plus sign.
Step 3: Press the ‘Share Content’ button in the control bar’s middle part at the bottom. That will help in connecting to the Zoom meeting.
Step 4: Tap on ‘Screen’ on the menu that appears. Proceed to access the control center and hold down the recording button. Some options will pop up.

Step 5: Tap on ‘Zoom’ and then ‘Start Broadcast’ to share the screen. If you want to stop, tap the red bar at the top and then ‘Stop’.
How to Share Screen on Zoom FAQs
1. Why can’t I share my screen on Zoom?
If you can’t share your screen on Zoom, check if you have permitted the sharing first. Ensure that you have followed the steps on how to share screen on Zoom before troubleshooting. If there are no results after sharing, try updating Zoom, or enable remote control of applications and screen share settings.
2. How to share 2 screens on Zoom?
If you are the host, you can share more than one screen. Go to the share screen option and click on the upward arrow. In the options displayed, click on ‘Multiple participants can share simultaneously’.
That will allow the participants to share their screens at the same time. The participants using more than one screen will see the shared screen on both monitors. Those with one screen will view the recently shared one and they have an option to switch.
For those on mobile, they can only view the recently shared screen and there is no option to switch. You also cannot share is others are sharing.
3. How to share screen on laptop?
You can use the steps used to share screen while on PC. After joining the meeting, you can start by visiting the Share Screen option and input the sharing key to continue. Click to see: How to Record Screen in Windows 10?
4. How to share screen on Chromebook?
Zoom on Chromebook utilizes the PWA (Progressive Web App) that brings the web experience on desktop. The steps to share the screen are the same when you click on the Share Screen option. There are also third-party apps that can help you share the screen here such as the Chrome Remote Desktop application.
Click to freely use iTop company's Free Online Screen Recorder.
Bonus Tip: How to Record a Zoom Screen Share on PC without Permission?
After checking on how to share screen on Zoom, do you have an idea on how to record it? You could ask permission from the host but if it’s denied, you may not have any other way out. To correct that, we have a remedy for you – the iTop screen recorder.
This is a screen recorder that you can use to record anything happening on your screen. So, getting the Zoom proceedings and the shared screens will not be a problem. The main reason why we recommend the iTop Screen Recorder is that it does not send notifications to the host or other participants.
It also has the qualities that enable it to give you the best out of the recording. First, it picks up your computer’s FPS rate to reduce the possibility of lagging. Second, it uses the GPU during performance and not the CPU.
That means most of its tasks are not forced on the CPU and that’s a great savior for CPUs under heavy use. You get recordings in HD and it achieves up to 4K. There is no limitation to how long you can record. So, as long as you want to capture the screen share and other parts of the Zoom meeting, iTop screen recorder will still be working.
Click to see: How to Record Zoom Meeting Without Permission? >>
After recording, you can edit by trimming the parts you don’t need, thanks to the embedded editing tool on the application. The app works with all Windows platforms and if you would like to learn more, please visit the main website and see what else it can do.
How to Record Zoom Share on PC without Permission?
Step 1: Download the iTop screen recorder from the main website, install and launch it to proceed.
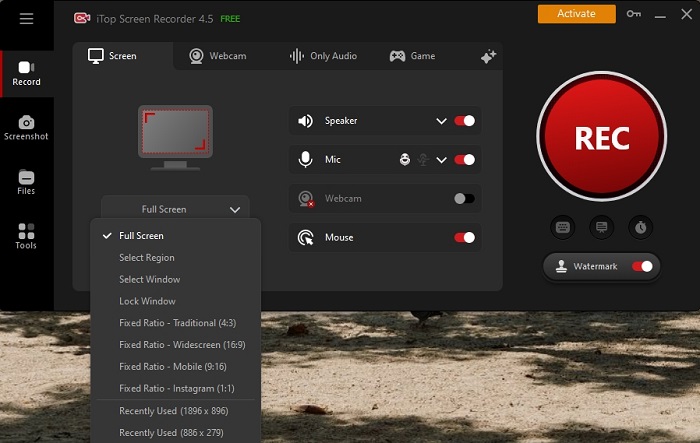
Step 2: Select the area you would like to record. You can go for the full screen or use the ‘Select Region’ option to freely select the area.

Step 3: If you would like to record the speaker, webcam, and mic among other options, click on the tabs displayed on the app’s main window. For more settings, click on the hamburger icon.
Step 4: Once you are ready to record, use the F9 hotkey to start. Alternatively, you can click on the big ‘REC’ button.
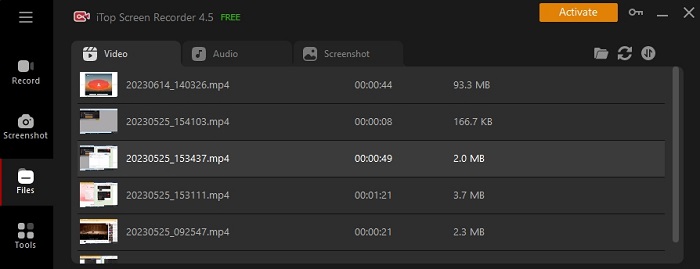
Step 5: After recording, click the stop button or hit F9 again. Access the video via the ‘My Files’ tab.

Conclusion
You now have an idea of how to share screen on Zoom via the different operating systems. It’s simple to do as you have seen and if there is any trouble, you can check the FAQ section to see how you can go about correcting some of the bugs.
If you want to record the shared screens, then you need a third-party application that will not make your request for recording permission. The iTop screen recorder solution is available and free to download. Have it on your PC and see how you will record smoothly without notifying those in the meeting.
 Vidnoz AI creates engaging videos with realistic AI avatars. Free, fast and easy-to-use.


