Apple Music was launched in 2015 aiming to offer users a fresh way to enjoy fantastic music all around the world. And now, it has become one of the most popular streaming services available on multiple platforms, macOS, iOS, Windows, web and more. The library embraces songs, albums, playlists and internet radio stations. You can easily access it through a subscription.The trouble is, almost all Apple Music songs are DRM-protected resulting in offline playback only available on iTunes and its App. And, you can only keep the downloaded songs for 30 days. Therefore, some people try to screen record Apple Music for better experience to listen to favorite songs offline.

Can you screen record Apple Music? How to record songs from Apple Music? Here, we will show the best solution to record Apple Music to MP3 with original quality.
Disclaimer: We do no advocate recording any copyrighted songs from Apple Music for commercial and illegal use.
How to Screen Record Apple Music on PC
Apple Music enables Windows users to listen to music and live radios on PC using iTunes, Apple Music Preview and web. No matter which way you’re using, you can screen record Apple Music with lossless audio through a professional screen recorder for Windows - iTop Screen Recorder.
iTop Screen Recorder is an easy yet powerful program to record screen, video and audio. It has a special audio recording mode that enables you to record audio only, both system audio and sounds from microphone. You can record streaming songs from Apple Music and other platforms like Spotify, SoundCloud and so on. It excels in outputting hi-fi audio in various formats, MP3, AAC, FLAC etc. Customized audio settings are also available. You can adjust bit rate, sample rate, channel and change format according to your requirements and devices. Denoiser is the bonus tool to reduce and even remove background noise from audio recording to create clearer music recording.
The Apple Music recorder has an intuitive interface. Without any guesswork, beginners can quickly get started with it. Now, let’s learn how to record Apple Music on Windows (11/10).
Step 1. Download and Install iTop Screen Recorder
It is fully compatible with Windows 11, 10, 8 and 7.
Step 2. Customize Settings
Launch iTop Screen Recorder. Click three lines on the top right corner of the interface and select Settings. Move to Format > Audio. Change Format, Bitrate, Frequency and Channel if necessary. After all settings are done, click Save.

Note: MP3 is the default output format.
Step 3. Start Recording
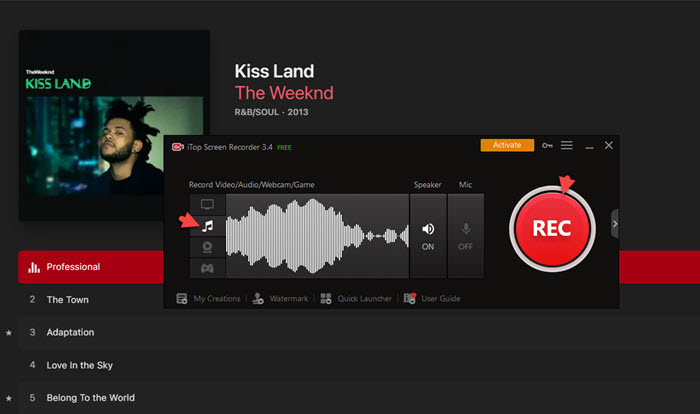
Click the Music note on the main interface to access audio recording mode. Turn on Speaker to make it screen record Apple Music with audio. Now, open and play your favorite song in Apple Music. Click REC button to start recording.

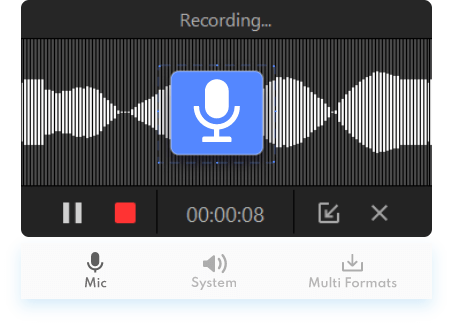
iTop Screen Recorder is also a great voice recorder to capture your voice or other sounds by turning on Mic. So, you can record your singing, music instrumental etc., on PC with ease.
Step 4. Stop Recording
The mini control bar appears after 3-second countdown. Click Done (the red-square shaped) button to stop recording.

Your Apple Music recording file will be automatically listed in My Creations > Audio. Click More (...) button and you can play, edit, denoise and upload it to SNS or cloud storage.

iTop Screen Recorder enables you to record music videos from Apple Music as well.
- Click on the screen icon to access screen/video recording mode.
- Select recording area. You can record part of screen, full screen and a window.
- Click on REC button to start recording.
- When you want to finish recording, click Done button on the mini control bar.
- Recording file is listed in My Creations > Video. You can play, edit or upload it.

How to Screen Record Apple Music on Mac
Mac has several pre-installed apps available to capture audio on computer without installing other software. QuickTime and Voice Memos are two mostly used tools that allows you to screen record Apple Music on Mac with ease.
How to Record Apple Music with QuickTime
Step 1. Launch QuickTime Player on your Mac. Choose File > New Audio Recording.
Step 2. Click the arrow next to Record button to set options. You can choose a microphone and recording quality.
Step 3. Click Record button to start recording and Stop button when you’re done.
Step 4. Click File > Save to set a location to save it with a new name.

If you screen record Apple Music with QuickTime, the file format will be AAC (high quality) or AIFF-C (maximum quality). You can open and play it in QuickTime or any compatible players.
Also Read: How to Record Screen with QuickTime >>
How to Record Apple Music with Voice Memos
Step 1. Open Voice Memos app on your Mac.
Step 2. Click Record button to start recording Apple Music.
Step 3. Click Done in the lower-right corner when you finish recording.

Your Apple Music recording will be saved with the name New Recording as a M4A file. You can also find the file under ~/Library/Application Support/com.apple.voicememos/Recordings/x.m4a.
As a matter of fact, QuickTime and Voice Memos can’t help you record Apple Music to MP3. If you prefer a MP3 recording that can be played on any device, you’d better choose a third-party music recorder, for example Audacity which is a free and open-source program compatible with macOS.
How to Screen Record Apple Music to MP3 with Audacity
Step 1. Download, install and launch Audacity on Mac.
Step 2. Play songs in Apple Music and click on the red Record button to start recording.
Step 3. Click Stop button to stop recording.
Step 4. Click File > Export > Export as MP3.

The Bottom Line
How to screen record Apple Music? It arrives as an easy mission if you get a solid screen recorder. iTop Screen Recorder is the best pick for Windows. It not only has an audio recording mode to record Apple Music with audio only, but a screen recording mode to record music videos in Apple Music. It guarantees high quality for both audio and video. A denoiser can enhance the audio to reduce background noise. Inbuilt program helps Mac users to record Apple Music conveniently, but if you want a MP3 recording file, third-party audio recorder is better.
 Vidnoz AI creates engaging videos with realistic AI avatars. Free, fast and easy-to-use.


