If you’re looking for an easy way to record a song at home, you’re in luck. Whether you’re an aspiring musician or a music enthusiast, this blog will show you simple methods to capture your musical creations in the comfort of your own space. With the simple and effective methods how to record a song at home, you can turn your home into a personal recording studio. This guide here is also friendly for beginners. Get ready to set up your home studio and start creating music today!

What Should You Do Before Recording a Song at Home
You can’t go straight to the recording process without preparation. You should set up the device you’ll use and make sure the connection is stable ahead of time. This is the key to a successful home recording session. Here’s what you need to set up to record a song online and offline.
Microphone: First, choose the right microphone according to your needs. A USB-connected microphone can provide you with better simplicity, while a condenser one will provide you with professional-quality audio.
Headphones: Invest in a good pair of headphones to monitor your recording and ensure accurate sound reproduction.
Audio Interface: Connect your microphone and headphones to an audio interface, which serves as the bridge between your instruments or microphone and your computer.
Recording Software: There are many recording software you can choose to record a song for free, great options include Audacity, GarageBand and iTop Screen Recorder.
How to Record a Song at Home Without Equipment?
The first recommended tool for you to record a song free is Voice Recorder. It is a Windows built-in app and comes with a user-friendly interface. Follow the step-by-step guide here to see how to record music at home with Voice Recorder for Windows:
Step 1. Search Voice Recorder in the Start Menu, and click the best match to open the Voice Recorder app.
Step 2. Click the microphone icon on the bottom right corner of the desktop, and then select the desired microphone input source.
Step 3. After setting up the input source, go back to Voice Recorder, and click on the “Record” button. Sing or play your instruments as the Voice Recorder app captures your performance.
 Windows Voice Recorder provides you with a basic audio recording feature, it does have some limitations and disadvantages you should be aware of. One of the main flaws of Windows Voice Recorder is it only provides minimal editing capabilities, making it difficult to fine-tune your recordings.
How to Record Music at Home with Screen Recorder APP
In addition to the built-in options, there are third-party apps that can offer more advanced features and flexibility for recording music at home. Here you will see three recommended screen recorder apps that can help you solve how to record music at home.
1. iTop Screen Recorder
iTop Screen Recorder is a free and simple-to-use screen recorder that not only enables you to capture video Windows 10 but also provides a music recording tool to help you capture the music sessions with ease.
Here are the benefits this app offers for you:
- 100% Free Screen Recorder: As its name suggests, iTop Screen Recorder allows you to record your computer screen and music sessions without any cost. It also provides a range of recording options including recording part of screen, a specific window, or an entire screen.
- Various Output Formats for Audio: With iTop Screen Recorder, you have the flexibility to choose from multiple output formats for your recorded music. It supports popular audio formats like MP3, AAC, WAV, and more, allowing you to select the format that best suits your requirements.
- Seamless Sharing for Recorded Songs: Once you've recorded your song, iTop Screen Recorder makes it easy to share your creations with the world. With just a few clicks, you can directly upload your recorded music to social media platforms such as YouTube, Facebook, or SoundCloud, connecting with your audience effortlessly.
- Simple-to-Use Interface for Music Producers: iTop Screen Recorder offers a user-friendly interface designed with music producers in mind. Its intuitive controls and easy-to-navigate settings allow you to focus on your music, without getting bogged down by complex recording processes.
Whether you're a beginner or an experienced musician, iTop Screen Recorder provides a convenient and efficient solution for capturing your songs at home. Besides music video recording, iTop Screen Recorder also enables you to edit video, which makes it a more valuable addition to your music recording toolkit.
How to Record a Song at Home for Free with iTop Screen Recorder?
Then follow this step-by-step guide to see how to use iTop Screen Recorder to record a song at home.
Step 1. Download iTop Screen Recorder by clicking the download button.
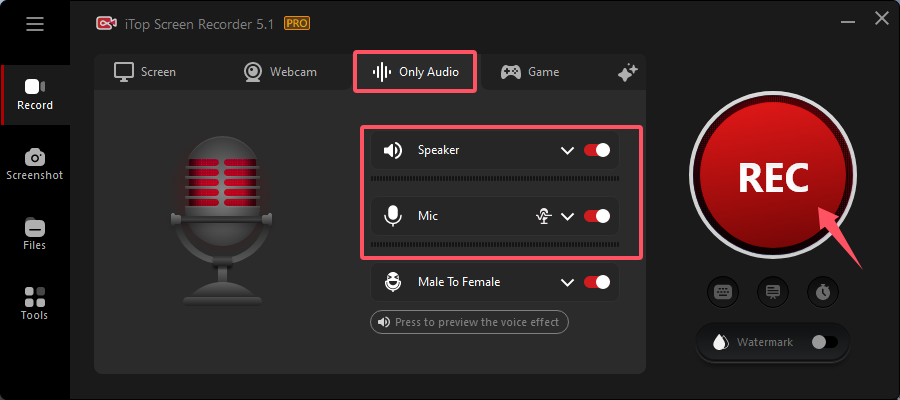
Step 2. Switch to the record audio tab, remember to check the Speaker and Mic connection first.
Step 3. Now click REC, the red recording button to start recording.

2. OBS Studio
The second screen recorder app introduced here is OBS Studio. OBS is an open-source software, and it is a popular and versatile screen recording and streaming software. While primarily known for its streaming capabilities, OBS Studio can also be a great tool for recording music at home. Here's a simple introduction to OBS Studio, along with its pros and cons.
Pros:
- Flexible Recording Options: OBS Studio offers a wide range of recording options, allowing you to record and edit your music with custom resolutions, frame rates, and audio sources.
- Advanced Audio Mixing: With OBS Studio, you can mix multiple audio sources, such as your microphone and instrument inputs, to achieve the desired audio balance in your recordings.
- Customizable Settings: The software provides extensive control over various recording settings, including video encoding, audio bitrate, and output formats.
- Real-Time Monitoring: OBS Studio allows you to monitor your recording in real-time, providing visual feedback and indicators to ensure that your audio levels and video settings are properly configured.
Cons:
- Steeper Learning Curve: OBS Studio can be more complex to set up and use compared to other screen recording apps, especially for beginners who are unfamiliar with its features and settings.
- Resource Intensive: Due to its powerful features, OBS Studio can be resource-intensive, requiring a relatively high-performance computer to run smoothly, especially when recording and streaming simultaneously.
- Lack of Built-in Editing Tools: OBS Studio is primarily focused on recording and streaming, so it lacks advanced editing capabilities. You may need to rely on separate video editing software to refine your recordings.
3. ShareX
The third introduced tool is ShareX. It is a comprehensive and versatile screen recording and sharing tool that offers a wide range of features for capturing and editing your music recordings. Here's an introduction to ShareX along with its pros and cons.
Pros:
- Flexible Recording Options: ShareX also allows you to record your music sessions in various formats and resolutions, giving you the flexibility to adjust the settings based on your specific needs.
- Powerful Editing Capabilities: ShareX has a built-in editor, enabling you to trim, crop, add text, and apply effects to enhance your music recordings.
Cons:
- Complexity for Beginners: Due to its extensive features and settings, users need to take some time to fully explore and understand ShareX’s capabilities.
- Potential Configuration Challenges: Some users may find the initial configuration and setup of ShareX to be slightly complex, especially when integrating with external services or customizing advanced settings.
How to Record a Song Online Free?
If you're looking for a convenient and accessible method to record a song online, iTop Screen Recorder offers an online tool that allows you to capture your musical performances without the need for any software installation. Here's a step-by-step guide to using iTop Screen Recorder's tool record a song online free.
Step 1. Go to the iTop online screen recorder, select a recording mode.
Step 2. Click Start Recording button, then allow your browser to access microphone.
Step 3. When the song stops, click Stop button to stop recording. Download your recording to local disk.
A Comparison of Screen Recorder
To help you make an informed decision, let's compare the key features of the recommended screen recorders. Please refer to the table below for a quick comparison:
Screen Recorder |
OS |
Ease of Use |
Editing Capabilities |
Output Formats |
Sharing Options |
Windows Voice Recorder |
Win |
Easy |
Limited editing tools |
Limited formats |
Limited sharing options |
iTop Screen Recorder |
Win/Web |
Easy |
Basic editing features |
Multiple formats |
Social media integration |
OBS Studio |
Win/Mac |
Difficult |
Extensive editing options |
Multiple formats |
Customizable sharing options |
ShareX |
Win |
Difficult |
Advanced editing capabilities |
Various formats |
Seamless sharing to multiple platforms |
This comparison chart highlights the strengths and weaknesses of each screen recorder. iTop Screen Recorder stands out as a user-friendly option. Its simplicity makes it an ideal choice for beginners or those seeking a straightforward recording experience. You can fix how to record your own music with iTop Screen Recorder.
The Bottom Line
Recording music at home has never been easier. By following the steps outlined in this guide, you will know how to record a song at home. iTop Screen Recorder is not only a user-friendly and feature-rich audio recording tool but also the best screen recorder for PC without watermark. Download this screen recorder now and start recording your music with ease.
 Vidnoz AI creates engaging videos with realistic AI avatars. Free, fast and easy-to-use.


