You often need audio screen recorders for recording meetings, game sessions, and lectures. Students and professionals need these screens during zoom meetings. If you don’t have a reliable screen recorder, you can't risk losing them.
However, if you get your hands on a good quality voice recorder for your Mac, Windows, iPhone, and Android, things could be more accessible. That is why we are listing the best audio screen recorder with external and internal audio for all kinds of devices, so keep reading.

Best Audio Screen Recorder for Windows
There are a lot of audio screen recorders on the market, but we are going to list only the 6 best ones. All 6 of these recorders have great voice quality and interface.
iTop Audio Screen Recorder
It is a free screen recorder suitable for Windows. You get HD video recording. Also, the iTop Screen Recorder is the best for audio and graphics for Windows. Moreover, the iTop screen recorder is suitable for gaming and educational purposes.
You can also record music or movies in this screen recorder; it also has a gaming mode for professional gamers on YouTube. You can select a particular area on the screen and record just that area, which is absent in most audio recording software. Let’s have a look at some of the features of the iTop screen recorder.
HD Screen Recording
The iTop software provides you with an HD display, 1080p & 60fps, and you can record yourself in real-time, download the recorded video on your PC and then use it however you want. You also get different kinds of video modes for screen recording like gaming mode, audio-only mode, scheduled recording, etc. You can also alter the size and quality of the video according to your preference.

Addition Filters and Stickers
If you are a gamer or an influencer, you might need certain filters and stickers to entertain your audience that other screen recorders usually do not offer. But iTop offers not just face filters but also background music to make your recording a little more entertaining. You can also add different images, stickers, and subtitles to your screen recording.
Only Audio
You can now record only audio through your iTop app with a lot larger sound frequency and excellent sound quality. There is no limit on on-screen audio recording on this audio screen recorder, and you get both mono and stereo modes.

Free and Easy to Share
The iTop is a completely free screen recorder, and it is effortless to share or upload your recorded videos on YouTube, Facebook, Instagram, and Google Drive.
Ad-Free with Unlimited Duration
You don’t have to endure ad pop-ups while using this screen recorder. The duration of the screen recording does not have a limit, so you can record Zoom meeting as long as you want.
How to Record Videos with the Best Audio Screen Recorder for Windows?
Follow all the below-given steps to record videos with iTop, the best audio screen recorder Windows you can find.
Step 1.Install and launch the screen recording software.
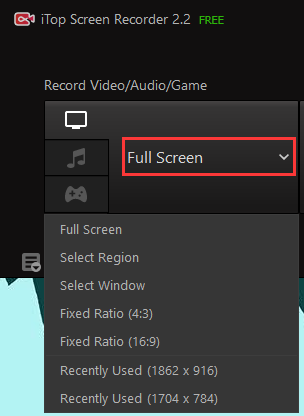
Step 2. Go to the software and set your preferences of either full screen or part of the screen.

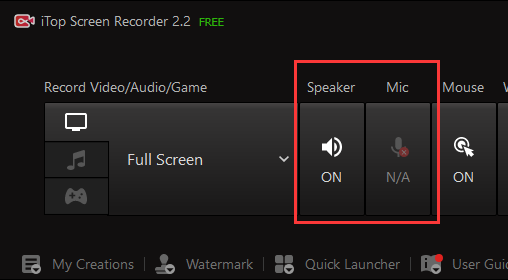
Step 3. Click on the on icon under the speaker or mic to record the audio.

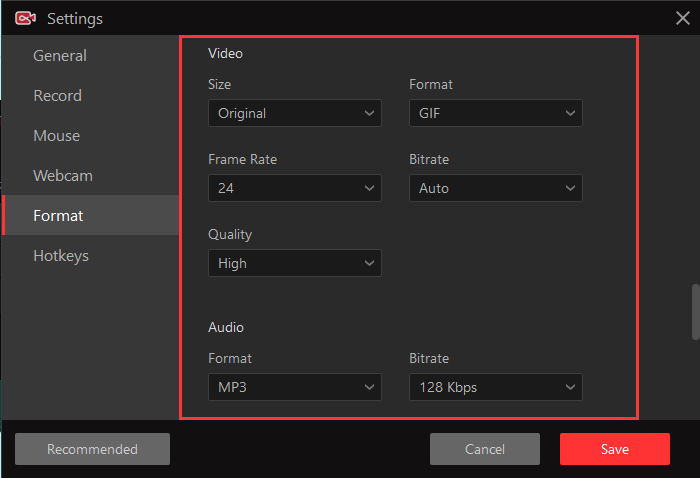
Step 4. Set the video and audio format in Settings. and then click on the record icon and crop the screen if you want.

Step 5. Save the video and edit it as per the requirements once you are done with recording.
CamStudio Audio Screen Recorder
CamStudio is more of an audio screen recorder Windows 10 suitable for work and study purposes because it only offers limited editing and features. But, it is a highly reliable software that can provide you with AVI videos that are highly compact.

Features
- The files are comparatively smaller and do not take up a lot of space
- You get multiple options for different quality settings
- Suitable for beginners
- Does not need excessive editing
How to Screen Record with Audio on Windows with CamStudio
Step 1.Launch the CamStudio software.
Step 2. Go to the Region icon on the top.
Step 3. Specify the region of the screen that you want to record.
Step 4. Now, click on the record button that is on top of the screen.
Step 5. You can specify the region either manually or enter the dimensions.
Step 6. Just click on the red recording icon, and it will start recording your screen.
OBS Audio Screen Recorder
This audio screen recorder is mainly used for live streaming, but it is pretty great for professional audio screen recording too. The app has options for different scenes and filters while offering the most advanced configuration to you.

Features
- Do not include watermark during screen recording
- No time limit on recording
- A lot of scenes and filters are included
- Easy to use
How to Screen Record with OBS on Windows
If you want to use OBS as audio screen recorder in Windows, make sure to follow these steps:
Step 1. Install OBS software and launch it on your PC.
Step 2. Scroll down, and you will see a Source box icon.
Step 3. Click on the source box and go-to options.
Step 4. Go for Display capture. Then, click on "OK.
Step 5. Now, go to settings. Select output, and on the bottom right, you will see an option for screen recording.
Step 6. Click on that option and then start recording.
Ezvid Audio Screen Recorder
Gamers are interested in this app because it is easier to share videos on YouTube directly using Ezvid. This software is handy for you if you want to record the screen for a short time. The speed and clarity of this software are very elite. The audio screen recorder is free for screen recording.

Features
- High resolution screen recording (1280x720p)
- Can upload the screen recording directly on YouTube
- Computer-generated audio for video making
- Record screen for up to 45 minutes
How to Screen Record with Audio on Windows Ezvid?
Recording your screen on Windows with the help of Ezvid is very easy, even with audio.
Step 1. You have to launch the Ezvid software first.
Step 2. Then, click on the screen capture icon on your screen.
Step 3. It will immediately start recording once you click on OK.
ShareX Audio Screen Recorder
This software is just as good as a paid audio screen recorder, mainly because it is free from any ads and because you get HD screen recording options with this software. You can also use the software to capture the screen and for slight editing.

Features
- You get the option of sharing the recordings via URL
- You can add custom watermarks in the screen recording
- Options for adding color effects
- Full-screen recording can also be enabled:
How to Screen Record with Audio on Windows with ShareX?
ShareX is a very reliable software and using it is every bit as easy. Follow these steps to use this software and record your screen with audio without any hassle.
Step 1. Launch the ShareX software.
Step 2. Go to the menu. Bring the cursor to the Capture option.
Step 3. Click on the screen recording option that is 12th on the list.
Step 4. It will start recording your screen right away.
Camtasia Audio Screen Recorder
If you are a professional and need an audio screen recorder with advanced features and don’t mind paying a price for it, then Camtasia has to be the best app for you. Screen recording on this app is of elite level, and it is pretty easy to navigate too.

Features
- Record video and audio separately and give an option of combining them later
- Have different options for video effects, filters, and animations
- You can edit your audio or video easily
- Addition of captions or quizzes
How to Screen Record with Audio on Windows?
Camtasia is the favorite audio screen recorder for everyone, and you can learn how to record your screen with this software by following just a few very simple steps.
Step 1. Open the Camtasia software on your PC.
Step 2. Click on the record icon. It will automatically start recording the screen. Also, set whether you want to go for full screen or not
Step 3. You can add audio later or at the same time.
Best Audio Screen Recorder for Mac
Mac comes with a built-in audio screen recorder, and whether you are a professional or a student, that recorder is made for everyone. Most people are satisfied with what the Mac screen recorder has to offer, and by far, it is the best screen recorder for the Mac operating system so let’s get into it and find out more.
Mac Audio Screen Recorder-QuickTime Player
If you want the best quality on Mac, make sure to go for the built-in app that is made specifically as anaudio screen recorder for Mac. You can disable background sound too with this screen recorder, and it provides you with an excellent resolution and sound quality overall.
The best thing about a Mac audio screen recorder is that it is very reliable, and you do not need to refer to any third-party application as an audio and screen recorder Mac.

Features
- Have the option to include high-quality audio
- It shows mouse clicks too in screen recording for lectures or guides
- The screen recording is easily shareable
- Record screen in HD
How to Record Videos with QuickTime Player for Mac?
For using an audio screen recorder Mac, follow the below-given steps:
Step 1. Go to applications and launch QuickTime.
Step 2. Click on "File". Go to the menu bar and select "new screen recording".
Step 3. You can change the settings before actually recording the screen. The arrow beside the red record button is the icon for changing settings.
Step 4. If you want to record your audio too, click on the arrow icon and select a microphone. You can adjust the volume of the recording too by using the slider on the screen.
Step 5. Once you are done with settings, click on the record button. You can either crop any area if you want to exclude it from the audio and screen recorder Mac or just click anywhere to start recording right away.
Also Read >>How to Screenshot Windows 10/8/7 Entire or Part of the Screen
Best Audio Screen Recorder for Android
Now that we know about an audio screen recorder for Mac, we often need one for Android. But, for an android screen recorder, you don’t have a lot of great options. It is the very reason why we are listing the best audio screen recorder for android phones.
X Screen Recorder
X Screen Recorder is launched by InShot. It is a paid tool, but its hype in the world of android is mainly because of how it functions. It is suitable for all kinds of games, lectures, and meetings because it records your video without any hassle. In addition, you also get an option of integrating audio in your recording by enabling the internal audio recording feature. The app does not slow your computer down and lets you edit the screen recording too. You don’t even have to go through the hassle of removing a watermark, either. So, all in all, it is a pretty reliable screen recorder with audio android.

Features
- Helps with video and audio screen recording
- Lightweight app
- Enables video editing
- Does not include a watermark in the recorded screen video
How to Record Videos with X Screen Recorder for Android?
Recording your video with this app is really easy too. We are listing all the steps to screen record with X screen recorder in android.
Step 1. Install the app on your phone from the google play store.
Step 2. Once it's installed, you will see an orange dot on the side of your phone screen.
Step 3. Click on that dot, and the options of screen recording will pop up.
Step 4. You can click on the camera icon and start recording from right there. Or, you can click on the app and go to the home screen.
Step 5. From there, click on the red record button at the bottom center. It will start recording right away.
Also Read >>8 Internal Audio Recorders That Capture System Sound, Microphone Sound
Best Audio Screen Recorder for iPhone
Unlike Android phones, the iPhone usually has a very reliable built-in system for screen recording. So, it is better to use that function instead of beating around the bush and going for other screen recorder software.
Apple Audio Screen Recorder
You can record everything happening on your screen in ultra-high definition with perfect audio. Because the software is made inside the iPhone, it does not lag at all, and neither make your phone slower.

Features
- Easy to use
- Reliable
- UHD screen recording
- Clear audio recording
How to Record Videos with the Best Audio Screen Recorder for iPhone?
For using the screen recorder on an iPhone, you just need to follow a few very simple steps.
Step 1. Go to your phone settings. Then click on Control Center.
Step 2. Click on the add button + right beside the screen recording.
Step 3. Go to the control center again. Click and hold the recording button and click on the microphone.
Step 4. Touch the start recording option. Wait for three seconds, and it will start recording your screen.
Final Thoughts
Recording your screen is much easier when you have access to all the great audio and screen recording software. It is better to go for built-in apps for both Mac and iPhone for audio screen recording because they are the best.
But, we would highly recommend you to use iTop audio screen recorder because it is all-inclusive software that provides you elite quality audio with an HD display. So, if you want a screen recorder for your PC, make sure to install iTop Screen Recorderand make your life easier.
 Vidnoz AI creates engaging videos with realistic AI avatars. Free, fast and easy-to-use.


